- Top Results
- Bosch Building Technologies
- Security and Safety Knowledge
- Security: Video
- Which are the components that establish a connection between BVMS& 3rd party management sy...
Which are the components that establish a connection between BVMS& 3rd party management system?
- Subscribe to RSS Feed
- Bookmark
- Subscribe
- Printer Friendly Page
- Report Inappropriate Content
Question
Which are the components that establish a connection between BVMS& 3rd party management system?
This article describes the different components that Bosch Video Management System offers to to establish a connection between Bosch Video Management System and a 3rd party management system.
This description helps you in writing your own commands for controlling Bosch VMS from inside your management system.
Answer
Notice!
Please note, that OPC is not the preferred solution for connecting Bosch VMS to 3rd party components. BU-ESS/MKP rather recommends using our existing .NET SDKs.
List of used abbreviations:
– AE: Alarms and Events
– Bosch VMS: Bosch Video Management System
– DA: Data Access
– HTML: Hypertext Markup Language
– I/O: Input/ Output
– OPC: OLE for Process Control (OLE: Object Linking and Embedding)
– XML: Extensible Markup Language
For details regarding Bosch VMS OPC Server, see Bosch VMS OPC Server.
For details regarding Bosch VMS Proxy, see Bosch VMS Proxy.
Installation section from this article describes how to install a connection between Bosch VMS and a 3rd party management system.
The files needed by OPC Server and Bosch VMS Proxy, are described in Configuration files.
Example for 3rd party client (HTML file), gives an example for a 3rd party application in form of an HTML file.
Components
The following software components are used to realize a connection:
– Bosch VMS OPC Server
Forwards events from Bosch VMS to the 3rd party software and forwards commands from 3rd party software to Bosch VMS.
It is installed but not automatically registered in Windows where Bosch VMS Management Server software is installed.
– Bosch VMS Proxy
Forwards events from Bosch VMS to the 3rd party software and forwards commands from 3rd party software to Bosch VMS.
It is installed on each computer where Bosch VMS Operator Client and/or Bosch VMS Management Server software is installed.
– 3rd party application
As an example we provide an HTML page with code (JScript) to send commands like Show Live or Show Playback to Bosch VMS Proxy. This HTML page can be integrated in a 3rd party management system.
It is installed on a computer where Bosch VMS Operator Client software is installed.
You can use Softing OPC Toolbox as a 3rd party application on a Bosch VMS Operator Client computer or on a standalone computer to send commands like open/close a relays to the Bosch VMS OPC Server.
The following image shows the connection between a 3rd party application and Bosch VMS Server via OPC Server and Bosch VMS Proxy:
Figure 1.1: Connection 3rd party application – Bosch VMS Management Server
See Bosch VMS Proxy commands that you can send from an application on 3rd party side to Bosch VMS Operator Client.
The connection between a 3rd party application and Bosch VMS Operator Client does not need OPC Server.
The commands being sent by the 3rd party application can be processed by an HTML file with code. For an example for such an HTML file, see Example for 3rd party client (HTML file).
- See section OPC Server events that are sent from 3rd party server to Bosch VMS OPC Server.
- See section OPC Server commands that you can send from 3rd party server to Bosch VMS OPC Server.
1. Bosch VMS OPC Server
The Bosch VMS OPC Server software is used for sending state changes of the following items from Bosch VMS to a 3rd party management system like Softing OPC Toolbox.
The following items are available:
– Input
– Relay
– Encoder
– Decoder
– Virtual Input
– Camera
Bosch VMS OPC Server has the following features:
– Notification of state changes in cameras, decoders, encoders
– Start and stop recording
– Control of relays and virtual inputs, status notification of I/O objects in Bosch VMS
On startup, OPC Server reads a Bosch VMS configuration file where all items like cameras, relays, inputs, decoders, encoders, virtual inputs are listed.
OPC Server supports DA V.2. DA helps creating the namespace and sending commands to devices like open or close a relay.
Note: It is not supported to directly send commands to devices via DA by changing the item’s value. To send commands use the DA item CMD. Also it is not supported to query the current state of a device using DA. Use AE instead when you want to be notified about a state change of a device.
The 3rd party system DA namespace looks like this:
This picture was made with Softing OPC Toolbox.
1.1. OPC Server events
OPC server notifies state changes on the Bosch VMS side with an AE event to the 3rd party Server. OPC Server events section describes the notified values.
The following table lists all error events which Bosch OPC Server can generate.
| Interface Type | Event Name | State Value | State Id |
|---|---|---|---|
| Camera / Signal Presence | |||
| Bosch.Vms.Server.VideoDevice | SignalPresence | Unknown | 0 |
| Bosch.Vms.Server.VideoDevice | SignalPresence | Present | 5 |
| Bosch.Vms.Server.VideoDevice | SignalPresence | NotPresent | 353 |
| Camera / Brightness | |||
| Bosch.Vms.Server.VideoDevice | SignalTooBright | SignalOK | 5 |
| Bosch.Vms.Server.VideoDevice | SignalTooBright | Signal-NotOk | 360 |
| Bosch.Vms.Server.VideoDevice | SignalTooDark | SignalOK | 5 |
| Bosch.Vms.Server.VideoDevice | SignalTooDark | Signal-NotOk | 361 |
| Camera / Noise | |||
| Bosch.Vms.Server.VideoDevice | SignalTooNoisy | SignalOK | 5 |
| Bosch.Vms.Server.VideoDevice | SignalTooNoisy | Signal-NotOk | 362 |
| Camera / Too blurry | |||
| Bosch.Vms.Server.VideoDevice | SignalTooBlurryState | SignalOK | 5 |
| Bosch.Vms.Server.VideoDevice | SignalTooBlurryState | Signal-NotOK | 377 |
| Camera / Motion | |||
| Bosch.Vms.Server.VideoDevice | MotionDetect | Motion Detected | 367 |
| Bosch.Vms.Server.VideoDevice | MotionDetect | Motion Stopped | 363 |
| Camera / Recording Mode | |||
| Bosch.Vms.Server.VideoDevice | RecordingMode | Alarm | 365 |
| Bosch.Vms.Server.VideoDevice | RecordingMode | None | 364 |
| Bosch.Vms.Server.VideoDevice | RecordingMode | Manual | 365 |
| Bosch.Vms.Server.VideoDevice | RecordingMode | Continuous | 368 |
| Bosch.Vms.Server.VideoDevice | RecordingMode | Motion | 367 |
| Camera / Visibility | |||
| Bosch.Vms.Server.VideoDevice | VisibilityState | On | 790 |
| Bosch.Vms.Server.VideoDevice | VisibilityState | Off | 791 |
| Camera / Protected Recording | |||
| Bosch.Vms.Server.VideoDevice | ExternalData | 792 | |
| Camera / Global Change | |||
| Bosch.Vms.Server.VideoDevice | GlobalChangeState | Global Change not detected | 378 |
| Bosch.Vms.Server.VideoDevice | GlobalChangeState | Global Change detected | 379 |
| Relay | |||
| Bosch.Vms.Server.RelayDevice | RelayState | Relay Error | 27 |
| Bosch.Vms.Server.RelayDevice | RelayState | Relay Closed | 301 |
| Bosch.Vms.Server.RelayDevice | RelayState | Relay Opened | 300 |
| Input | |||
| Bosch.Vms.Server.InputDevice | InputState | Input Error | 27 |
| Bosch.Vms.Server.InputDevice | InputState | Input Closed | 24 |
| Bosch.Vms.Server.InputDevice | InputState | Input Opened | 25 |
| Virtual Input | |||
| Bosch.Vms.Server.VirtualInput | InputState | Input Closed | 24 |
| Bosch.Vms.Server.VirtualInput | InputState | Input Opened | 25 |
| Encoder | |||
| Bosch.Vms.Server.EncoderDevice | EncoderState | On | 25 |
| Bosch.Vms.Server.EncoderDevice | EncoderState | Off | 24 |
| Bosch.Vms.Server.EncoderDevice | ConnectionState | NotAuthorized | 0 |
| Bosch.Vms.Server.EncoderDevice | ConnectionState | Connected | 25 |
| Bosch.Vms.Server.EncoderDevice | ConnectionState | Disconnected | 24 |
| Decoder | |||
| Bosch.Vms.Server.Decoder | DecoderState | On | 25 |
| Bosch.Vms.Server.Decoder | DecoderState | Off | 24 |
| Bosch.Vms.Server.Decoder | ConnectionState | NotAuthorized | 0 |
| Bosch.Vms.Server.Decoder | ConnectionState | Connected | 25 |
| Bosch.Vms.Server.Decoder | ConnectionState | Disconnected | 24 |
| IntrusionPanel / Area | |||
| IntrusionPanelArea | AreaState | Armed | 304 |
| IntrusionPanelArea | AreaState | Disarmed | 307 |
| IntrusionPanel / Door | |||
| IntrusionPanelDoor | IntrusionPanelDoorState | Locked | 314 |
| IntrusionPanelDoor | IntrusionPanelDoorState | Unlocked | 313 |
| IntrusionPanelDoor | IntrusionPanelDoorState | Secured | 315 |
| IntrusionPanel / Point | |||
| IntrusionPanelPoint | IntrusionPanelAlarmState | Normal | 5 |
| IntrusionPanelPoint | IntrusionPanelAlarmState | Alarm | 1000 |
| IntrusionPanelPoint | IntrusionPanelAlarmState | Bypassed | 2818 |
| IntrusionPanelPoint | KeypadPanicAlarmState | Normal | 5 |
| IntrusionPanelPoint | KeypadPanicAlarmState | Alarm | 1191 |
| IntrusionPanelPoint | KeypadPanicAlarmState | Bypassed | 2818 |
| IntrusionPanelPoint | DoorLeftOpenedState | Normal | 5 |
| IntrusionPanelPoint | DoorLeftOpenedState | Alarm | 1059 |
| IntrusionPanelPoint | DoorLeftOpenedState | Bypassed | 2818 |
| IntrusionPanelPoint | FireAlarmState | Normal | 5 |
| IntrusionPanelPoint | FireAlarmState | Alarm | 1086 |
| IntrusionPanelPoint | FireAlarmState | Bypassed | 2818 |
| IntrusionPanelPoint | GasAlarmState | Normal | 5 |
| IntrusionPanelPoint | GasAlarmState | Alarm | 1106 |
| IntrusionPanelPoint | GasAlarmState | Bypassed | 2818 |
| IntrusionPanelPoint | MedicalAlarmState | Normal | 5 |
| IntrusionPanelPoint | MedicalAlarmState | Alarm | 1156 |
| IntrusionPanelPoint | MedicalAlarmState | Bypassed | 2818 |
Table 2.1: Bosch VMS OPC Server Event Details
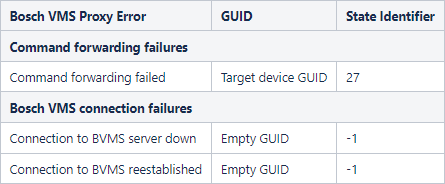
Table 2.2: Bosch VMS OPC Server / Bosch VMS Proxy Error Events
1.2. OPC Server commands
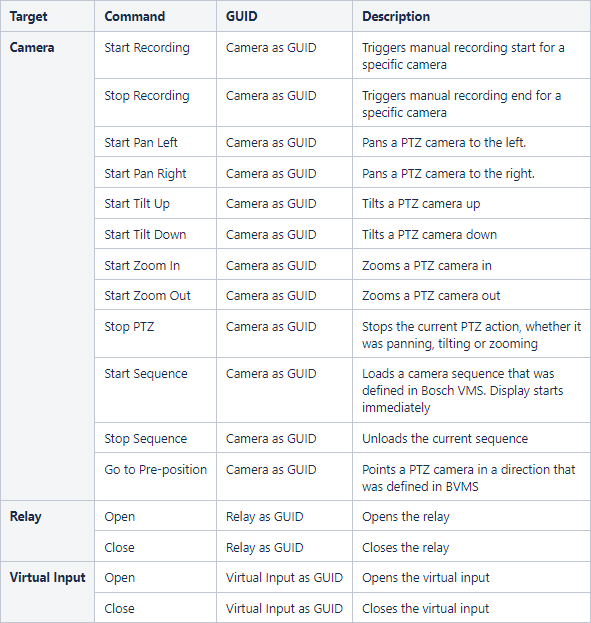
The following table lists the commands that you can send with OPC Server:
Table 2.3: List of commands (OPC Server)
2. Installation
This chapter describes the steps required to install the connection between a 3rd party system and Bosch VMS
2.1. Bosch VMS Server
Ensure that Bosch VMS Version 1.1.3 or higher is installed and that the Management Server is started on the Bosch VMS server computer.
To install:
1. Start Bosch VMS Configuration Client on the Management Server.
2. Create a user group with one or more users and no password (see Bosch VMS online help for details).
3. Export the configuration of Bosch VMS to BVMSConfig.xml via the menu BVMS Configuration Client (the application should be started under administrator Windows user) System->Export Device Information for OPC. The export destination folder must be \Bosch\VMS\bin\.
Each time the Bosch VMS configuration is changed, repeat this step and restart BVMSOpcServer.exe. You perform this restart with restarting Softing OPC Toobox.
BVMSOpcServer.exe is automatically installed with Bosch VMS Server installation. The Server installation also automatically installs OPC Core Components 2.00 Redistributable 2.20.msi which is required for running the Bosch VMS OPC Server.
1. Create a Windows user with the name MgtS-Service with a password that complies with the password policy of the server concerned.
Note: Ensure that this password is also configured on the BIS Server.
2. For registering the OPC Server and setting appropriate DCOM settings, run:
\Bosch\VMS\bin\RegisterBvmsOpcServer.exe
Note: run in in terminal started under administrator Windows user
3. Confirm the password for the MgtS-Service user configured earlier.
4. Edit Bosch.Vms.BISProxy.config for the user credentials of the administrator user (see Bosch VMS Proxy Configuration File, page 17 for details).</installation directory></installation directory>
2.2. Bosch VMS Operator Client and 3rd party client
We recommend using a dual monitor system.
Configure the IE security settings:
1. On the Tools menu, click Internet Options.
2. Select the Security tab.
3. Select Trusted Sites.
4. Click Custom Level.
5. Enable the options Download unsigned ActiveX controls and Initialize and script ActiveX controls not marked as safe and click OK.
6. Click Sites:
7. Deactivate the option Require server verification (https:) for all sites in this zone and add the name of the 3rd party server computer.
8. Add your custom web page to the trusted sites.
In one particular case editing the configuration file Bosch.VMS.BISProxy.config is recommended: if the client computer has multiple network adapters installed, enter the IP address of the LAN network adapter manually in the configuration file.
- Enter the IP address of the client computer.
Example:
<?xml version="1.0" encoding="utf-8" ?>
<configuration>
<appSettings>
<add IsServerMode="o">
<!–<add Host="127.0.0.1"/>→
<add Login="Admin"/>
<add Password=""/>
</appSettings>
</configuration>
Start the Operator Client of Bosch VMS, select the Bosch VMS server and log on using the same account as configured with Configuration Client.
3. Bosch VMS Proxy
Bosch VMS VMS Proxy has the following features:
– Displaying a selected camera on a Bosch VMS monitor (Bosch VMS supports maximum 4 digital monitors)
– Starting instant playback for a pre-configured time period
– Starting and stopping Bosch VMS Operator Client from the 3rd party side
The Bosch VMS Proxy is implemented as a COM server, i.e. the delivery is a DLL which is installed and registered as part of the Bosch VMS server and client installation. The COM server implementation allows for accessing the Bosch VMS Proxy functionality from either C++/C# code but also from scripting code like JScript.
Currently both ways to access the Bosch VMS Proxy functionality are used for the 3rd party system/Bosch VMS connection: access via JScript from within the 3rd party system client (browser based client using HTML with embedded JScript code) and access via C++ code from within OPC Server.
Bosch VMS Proxy forwards 3rd party system-triggered commands to Bosch VMS, see Bosch VMS Proxy commands section.
3.1. Bosch VMS Proxy commands
Some commands like Show Live Image or Playback are forwarded directly to the Bosch VMS Client via Bosch VMS Proxy without OPC Server due to performance reasons.
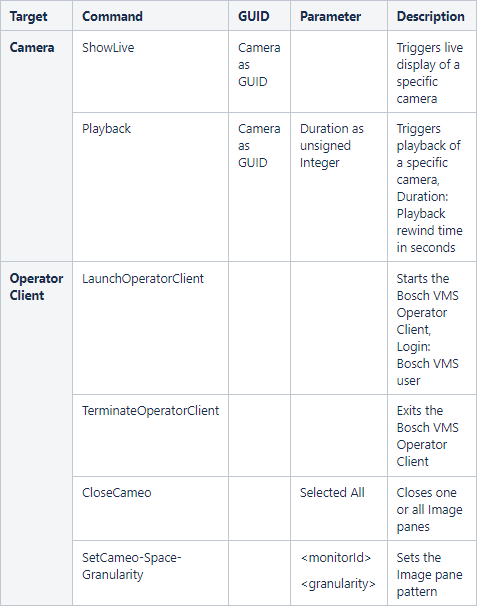
The following table lists the available commands that can be forwarded from the 3rd party client to Bosch VMS via Bosch VMS Proxy.
Table 4.4: List of commands (Bosch VMS Proxy)
Use the GUIDs from BVMSConfig.xml.
Show Live / Show playback image
These commands display a camera image in the next free Image pane of Bosch VMS Operator Client or in the selected Image pane if all Image panes already display camera images.
Start/Stop Bosch VMS Operator Client
Bosch VMS Operator Client is started/stopped after 3rd party system logon, via JScript. To achieve this, a Proxy method is called which starts/stops the Bosch VMS Operator Client. The method gets an XML string as parameter which describes the command. Additionally the command has another parameter containing the user name of the Bosch VMS user.
Note: Do not configure a password for this user.
The command looks like this:
<nsPV:Command xmlns:nsPV=file:///S3K/Proxymanager Name=”LaunchOperatorClient”>
<nsPV:Parameters>
<nsPV:Parameter Name=”Login” display name=”Login” ... >[Bosch VMS user]</
nsPV:Parameter>
</nsPV:Parameters>
</nsPV:Command>
To stop the Bosch VMS Operator Client:
<nsPV:Command xmlns:nsPV=file:///S3K/Proxymanager Name=”TerminateOperatorClient” />
The user is asked to confirm exiting the application.
4. Configuration files
This section describes all configuration files that are required for the connection of the 3rd party system and Bosch VMS.
To initialize the OPC Server correctly, its configuration is built during the startup of the server by reading BVMSConfig.xml. and BVMSCommand.xml.
To obtain BVMSConfig.xml, you export this file from within Bosch VMS Configuration Client after each configuration change.
Note: Bosch VMS OPC Server discards state changes from unknown addresses and ignores commands on unknown addresses (filtering via GUID).
- BVMSConfig.xml
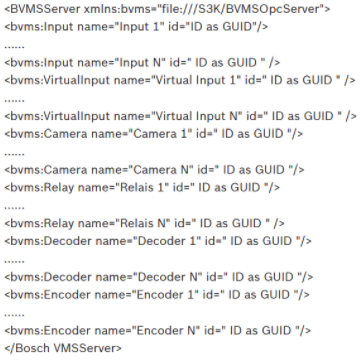
To create BVMSConfig.xml use Bosch VMS Configuration Client (see Bosch VMS Server section). This file lists all Bosch VMS devices with their name and their unique identifier. This file is used as input for the OPC server.
Structure of a configuration file:
Descriptions:
– Camera: Data of a Camera item (name and identifier of the component).
– Relay: Data of a Relay item (name and identifier of the component).
– Input: Data of a Detector item (name and identifier of the component).
– VirtualInput: Data of a Detector item (name and identifier of the component).
– Decoder: Data of a Decoder item (name and identifier of the component).
– Encoder: Data of an Encoder item (name and identifier of the component).
Description of the attributes:
– Name: name of the component
– id: unique 128 bit key of the component (identifier realized as GUID)
- BVMSCommand.xml
The Bosch VMS Proxy command file is automatically installed on the Bosch VMS server machine (for example, in \Bosch\VMS\AppData\BVMSCommand.xml).
The definition of an item’s command is stored in BVMSCommand.xml. The OPC server also reads these data on startup and depending on the item type (camera, relay, etc.) these data is stored in the properties of the CMD item. Additionally all command items have an attribute id as GUID, which identifies a relay, virtual input, or camera.
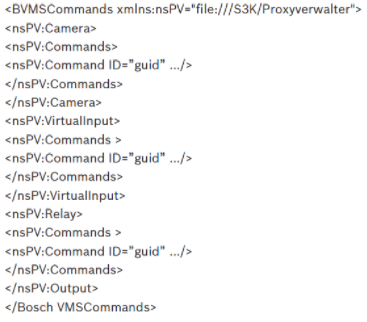
A possible structure of the file can look like this:
Descriptions:
– Camera: definition of the commands for the item type Camera
– VirtualInput: definition of the commands for the item type Virtual Input
– Relay: definition of the commands for the item type Relay
An example for displaying a camera on a monitor can look like this:
<nsPV:Commands>
<nsPV:Command Name="ShowLive" OPCServerKlasse="OPCBVMSOpcServer"
Anzeigename="Show Camera" Description="Display images on a monitor" ID=“id as GUID“>
</nsPV:Command>
</nsPV:Commands>
- BVMSOpcServer.xml
The OPC Server reads this file during initialization. If the file is not present, the OPC Server uses default values which are displayed in the example below.
Example of a file:
<BVMSOpcServer debg="0" disconnectionTimeout="0"/>
The file evaluates two values: debug and disconnectionTimeout.
The following values are possible for debug: 1 or 0.
If debug = 1, OPC Server logs all notifications coming from Bosch VMS in %CommonApplicationData%\Bosch\VMS\Log \BVMSOpcServer.xml
On an English Windows OS, %CommonApplicationData% usually is C:\Documents and Settings\All Users\Application Data
- disconnectionTimeout specifies the number of seconds to wait for the next update of the Error item (Malfunction), when the connection to Bosch VMS gets lost.
- disconnectionTimeout is only required when the connection to Bosch VMS is lost very often for a short time (< 20 s).
- BVMSOpcServer_Commands.log contains commands received from BIS Server to send to the Bosch VMS Proxy.
- BVMSOpcServer.log contains connect/disconnect messages and processed Bosch VMS events.
- BVMSOpcServer_Events.log contains events received from Bosch VMS Proxy.
- Bosch VMS Proxy Configuration File
The Bosch VMS Proxy configuration file is automatically installed when installing either a BVMS client or a BVMS server (for example, in \Bosch\VMS\AppData \Bosch.Vms.BISProxy.dll.config).
This file contains information about the Bosch VMS Proxy execution mode, an optional client host IP and the credentials to be used for logging on to the Bosch VMS SDK.</installation directory>
For server installations, the configuration file defaults are:
<add IsServerMode="1"/>
<add Login="Admin"/>
<add Password=" "/>
These settings cause that the Bosch VMS Proxy is started in server mode (which is a precondition for properly collaborating with OPC Server) and that SDK commands are executed using the given user credentials.
For client installations, the configuration file defaults are:
<add IsServerMode="0"/>
<!–<add Host="127.0.0.1"/>→
<add Login="Admin"/>
<add Password=" "/>
These settings cause that the Bosch VMS Proxy is started in client mode (which is a precondition for triggering client commands like ShowLive) and that Bosch VMS SDK commands are executed using the given user credentials.
The Host setting is optional and should only be set to the IP of the LAN network card in case of multiple network cards (e.g. a WLAN or a second LAN network card) being installed in the client system
- Bosch VMS Proxy Logging Configuration File
The Bosch VMS Proxy logging configuration file is automatically installed on the Bosch VMS client machine (e.g. in \Bosch\VMS\AppData\BISProxyLogCfg.xml for English Windows). This file configures the Bosch VMS Proxy Log4Net logging settings.
- Example for 3rd party client (HTML file)
A sample HTML file with JScript code used for sending commands to Bosch VMS is available in \Bosch\VMS\Samples\BVMSProxySample.htm.
For the list of commands used in this sample, see Bosch VMS Proxy commands, from above. The GUIDs are taken from an example BVMSConfig.xml.
- Other OPC commands :
- The up to date sample commands can be found in
C:\Program Files\Bosch\VMS\Samples\OPCServer, such as:- Close Relay
- Close Virtual Input
- Open Relay
- Open Virtual Input
- Start Recording
- Stop Recording
- The up to date sample commands can be found in
Still looking for something?
- Top Results


