- Top Results
- Bosch Building Technologies
- Security and Safety Knowledge
- Security: Video
- How to create CA signed certificates for cameras and distribute CA certificate in large sy...
How to create CA signed certificates for cameras and distribute CA certificate in large systems
- Subscribe to RSS Feed
- Bookmark
- Subscribe
- Printer Friendly Page
- Report Inappropriate Content
📚 Overview:
- BVMS recording authenticity feature
- Solution concept and system security
- Required system components
- Versions
- 1. Create camera certificates
- 1.1 Using CA certificate from Domain Controller in Configuration Manager
- 1.2 Using MicroCA from Configuration Manager
- 1.2.1 MicroCA certificate on Windows Certificate Store
- 1.2.2 MicroCA certificate on USB stick
- 1.3 Replacing CA certificates in Configuration Manager
- 1.4 Bulk creation of camera certificates using Configuration Manager
- 2. Distribute CA certificates to BVMS Operator Client computers
- 2.1 Create AD computer group for BVMS Operator Client workstations
- 2.2 Configure a domain policy for workstations group
- 2.3 Distribute CA certificate
- 3. Restrictions
- Glossary
This article provides a step by step description of how to create certificates and configure their distribution in the large systems. For some of the steps a domain controller and optionally a Windows Certification Authority are required. It is assumed that these components already exist in the system as setting up of them is out of this document scope.
BVMS recording authenticity feature
In case any incident in a public building happens, the security officer needs to export a video clip and provide it to police as an evidence. Therefore the security system is required to provide a possibility to check that the exported video was not altered. As per most of the tenders this has to be achieved by hashing combined with certificates.
The implementation of this requirement in BVMS is following.
The camera is signing the hash values with the private key of its HTTPS certificate and saves the video together with the certificate on the iSCSI. During the video authenticity check BVMS Operator Client makes a replay and checks the hash values against the received video footage and verifies the digital camera signature against the certificate installed in its Windows Certificate Store. It uses the certificates installed under trusted root certificates path. The system can handle certificates that are self-signed or signed by a Certification Authority (CA).
Self-signed certificates are easier to create, but they are not so secure and that also would mean that each BVMS Operator Client should have each of the self-signed certificate from each camera installed on its Windows Certificate Store. Taking into account that a system can consist of more than 500 cameras and 50 BVMS Operator Clients, the manual setup and maintenance of such a system requires an inacceptable amount of time.

When using a CA signed certificate an effort of creating such a certificate for each camera is higher. This however provides a higher security and only 1 CA certificate has to be distributed on each BVMS Operator Client. Nevertheless executed manually for each single large system component this method also consumes an inacceptable amount of time.

Step-by-step guide
Solution concept and system security
In order to configure authenticity check in BVMS system, each camera has to have a certificate assigned to its HTTPs server. The certificate has to be installed on each BVMS Operator Client that should be able to verify the video.
be saved in Certificate Store of the local computer or on a USB stick.
Once camera certificates are signed and created, the CA certificate has to be distributed to each BVMS Operator Client. In this solution concept it is done using Active Directory (AD). The CA certificate has to be exported by CM and imported to the group policy settings of AD. The exported
CA certificate introduces low risk as only a certificate with public key is extracted in this case.
Required system components
In order to configure a bulk certificate creation and distribution, following components have to be available in the system:
• CM version 7.10 or higher – for creating CA signed certificates in the cameras.
• Configured Windows Certification Authority (Optional) – in case the domain certificate should be used for signing camera certificates. Setting up and configuring a Certification Authority is not within the scope of this document.
• Domain Controller with an Active Directory – for distributing the CA certificate to the workstations.
Versions
This step by step description was created using following system component versions:
• BVMS 10.0.0
• CM 7.10
• Camera firmware: 5.70 to 7.50
• Server OS: Windows Server 2012; Windows Server 2016
• Workstation OS: Windows 10
1. Create camera certificates
2. CM own MicroCA certificate that is saved on the same computer in the Windows Certificate Store
3. CM own MicroCA certificate saved on a USB stickThis chapter describes how to load (in case of DC certificate) or create the CA certificates and how to create a nd sign the camera certificates. Even though CM can handle multiple CA certificates, for a normal operation only one CA certificate can be used.
1.1 Using CA certificate from Domain Controller in Configuration Manager
If a system DC has a Certification Authority with its own CA certificate configured and the network is properly secured, CM can use this certificate for signing the new created camera certificates .
Please be aware of the risks described in the chapter Solution concept and system security.
DC certificate can be loaded to CM in following way:
2. In CM go to Preferences / Security and click on the button Load:
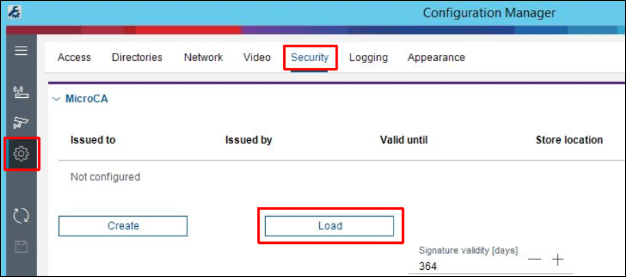
3. In order to use the CA certificate from Domain Certification Authority, choose Local Machine Certificate Store in the drop down menu:

Once the right certificate is chosen, press Load button.

The loaded certificate is shown under Preferences / Security. This certificate will be automatically used for signing the new created camera certificates.

1.2 Using MicroCA from Configuration Manager
CM is capable of creating its own MicroCA and sign camera certificates with it. The MicroCA root certificate can be saved in the local Windows Certificate Store, as a smart token using a smart card or as a file on USB stick. The step by step description in this chapter concentrates on the solution with encrypted USB stick and local Windows Certificate Store.
1.2.1 MicroCA certificate on Windows Certificate Store
By saving CM certificate on the computer that is meant to be online all the time please be aware of the risks discussed in the chapter 1.3.
1. CM can be installed on any PC that fulfills the requirements from its release letter .
2. In the CM go to Preferences / Security and click Create button:
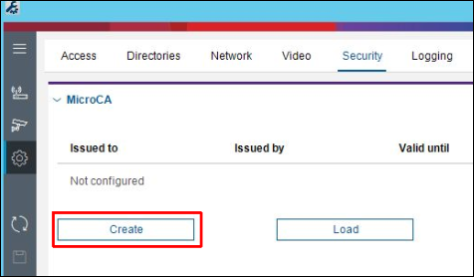
3. Select Current User Certificate Store as Certificate store type, enter the rest of the data in the dialog and press Create button:
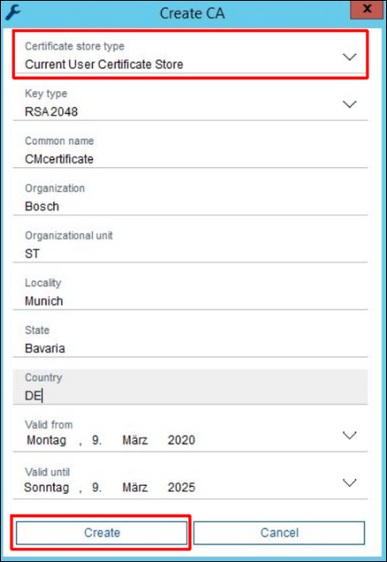
The certificate is now available on the computer and it can be loaded from the Current User Certificate Store again in case it was deleted from CM configuration.
1.2.2 MicroCA certificate on USB stick
The CM own MicroCA certificate on the USB stick can be configured in a following way:
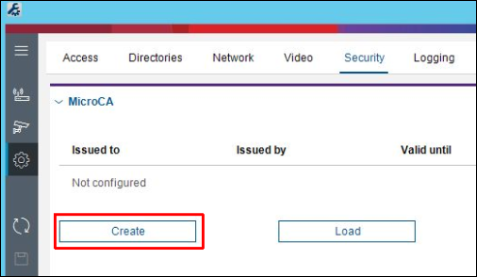
4. Select USB File as Certificate store type and location in the encrypted USB stick as Certificate store location, enter the rest of the data in the dialog and press Create button:
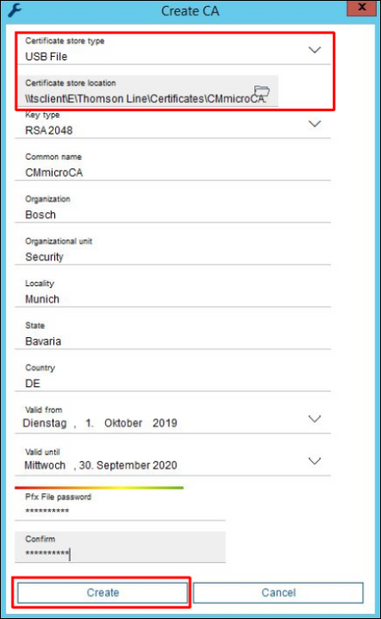
Once a root certificate was created, it appears in the CM under Preferences / Security.
CM saves the link to the file with certificate, but not the certificate itself. Once the USB stick is removed no signing with the new created certificate is possible.

Simply copy the content from one USB stick to the other.
1.3 Replacing CA certificates in Configuration Manager
CM can use multiple CA certificates for signing, however it is possible to use 1 CA certificate at once. Even though only 1 certificate is used, it has to be replaced regularly once its validity period has expired.
In order to exchange a CA certificate the currently used one has to be deleted first. This can be done with delete button next to the certificate under Preferences / Security:

The next certificate can be uploaded or created with load or create buttons like explained in the chapters 1.1 and 1.2.
1.4 Bulk creation of camera certificates using Configuration Manager
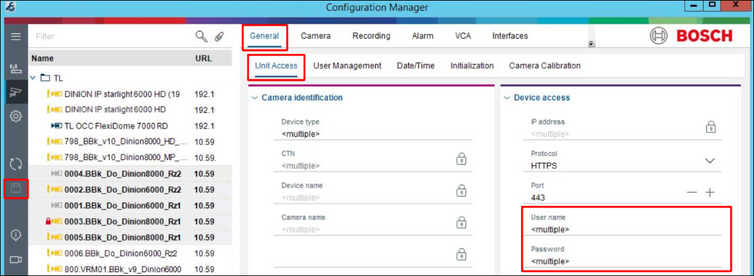
Once CA certificate is available in CM configuration, bulk camera certificates can be created in a following way:
Note: If entire VRM is added to the CM My Devices tab, all the cameras in its configuration and their passwords are automatically included to CM. VRM can be added and authenticated in the same way like it is described for the cameras above.
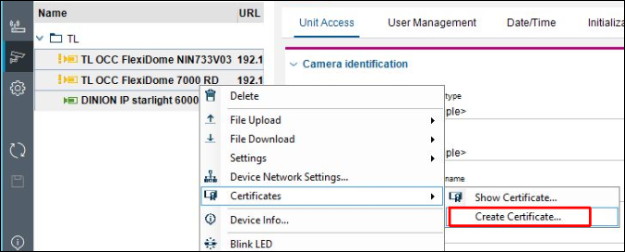
2. Select multiple cameras, right click on them and choose Certificates / Create Certificate:
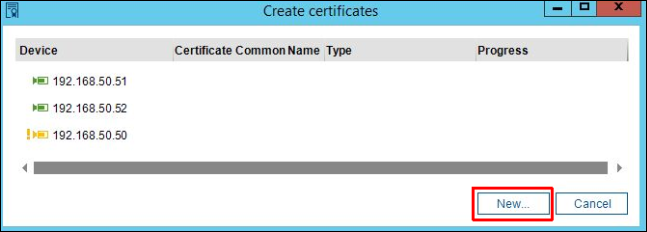
3. Click on New:
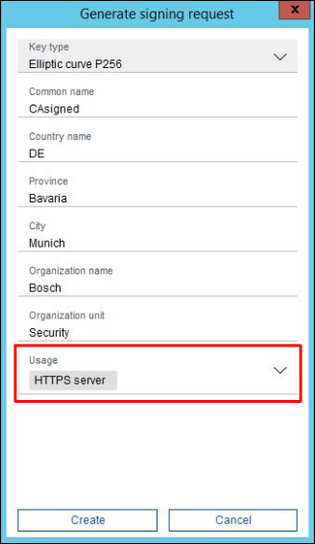
4. In the signing request generation mask enter the credentials, choose HTTPS server as usage and press Create button. If nothing is entered as a Common name, the certificate’s name will be its camera’s IP address. Please be also aware of restrictions described in the chapter 3. Restrictions
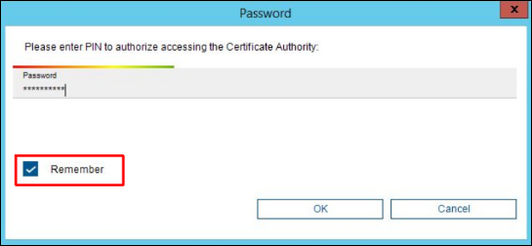
5. In case a CA certificate from USB stick is used, CM will prompt to enter the password of the certificate file that was configured in the chapter1.2.2 MicroCA certificate on USB stick, step 4. Select the check box Remember so that CM can use the password for signing the certificates of all the selected cameras. Otherwise CM will ask for a password for every camera separately. Press OK button to continue.
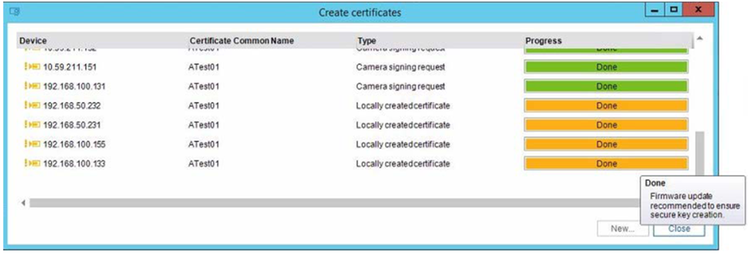
6. CM requests certificate signing requests from the cameras, signs them with CA certificate from its configuration and uploads the signed certificates back to the cameras. Operation status is shown in the progress bar for every camera separately. Please be aware that older cameras may take some minutes in order to generate a signing request.

Once the certification is done, the dialog window can be closed with the close button.
Please be aware of restrictions described in the chapter 3. Restrictions

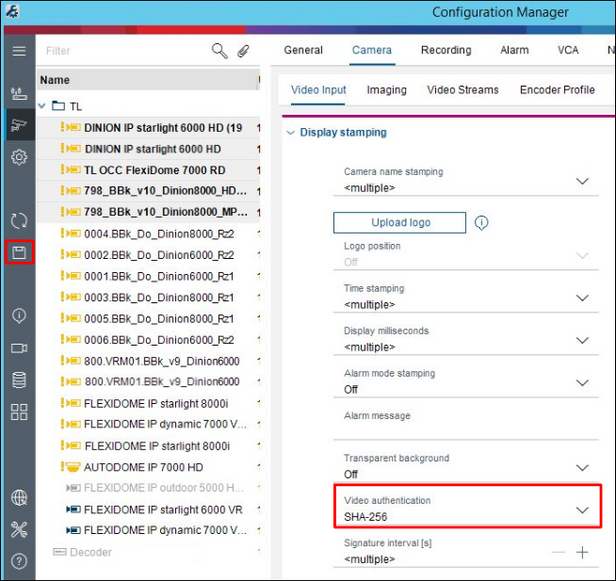
7. For video authentication feature in BVMS an authentication method has to be configured in the camera. The setting can be changed in CM under Camera/Video Input while multiple cameras are selected. SHA-256 method is recommended. Once configured press save button.
2. Distribute CA certificates to BVMS Operator Client computers
2.1 Create AD computer group for BVMS Operator Client workstations
1. In the AD computer open the Server Manager and go to Tools / Active Directory Users and Computers:

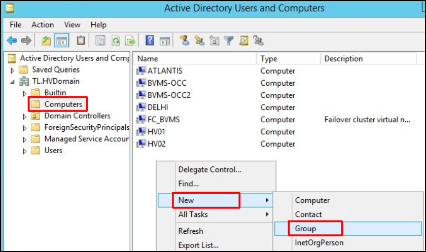
2. In the Active Directory Users and Computers navigate to Computers on the left side. On the right side right click and select New / Group:
3. Enter the group name and select group scope Global and group type Security. Click OK.

4. Right click the new created computer group and select Properties:

5. Press Add button in order to add the BVMS Operator Client workstations to the group:


7. Enter workstations’ host names and press OK:

The workstations are now added as member computers to the group. Press OK :

8. Reboot the added workstations so that the AD changes take effect immediately.
2.2 Configure a domain policy for workstations group
1. In the DC computer open the Server Manager and go to Tools / Group Policy Management:

2. Right click the domain and select Create a GPO in this domain, and Link it here:

3. Enter the group policies' name and click OK:

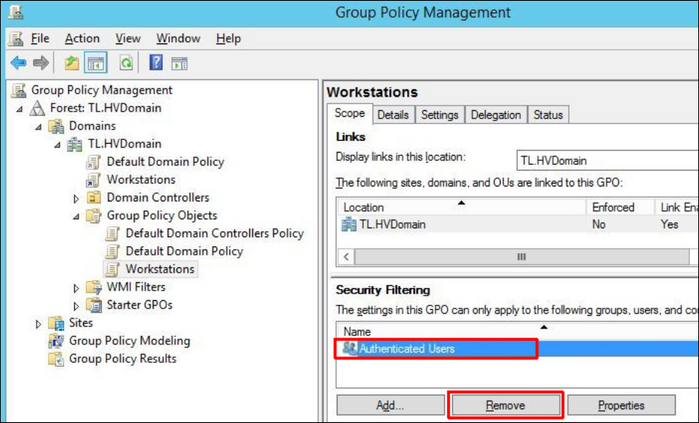
4. Click on the new created group policy, select Authenticated Users on the right side and press Remove button. This is because certificates should be applied only on the workstations and not on all the members of domain.
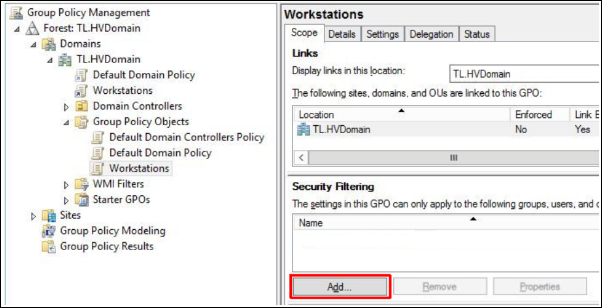
5. Click Add button and select the workstation computer group created in the chapter 2.1:

6. Go to the Delegation tab, press Add button:
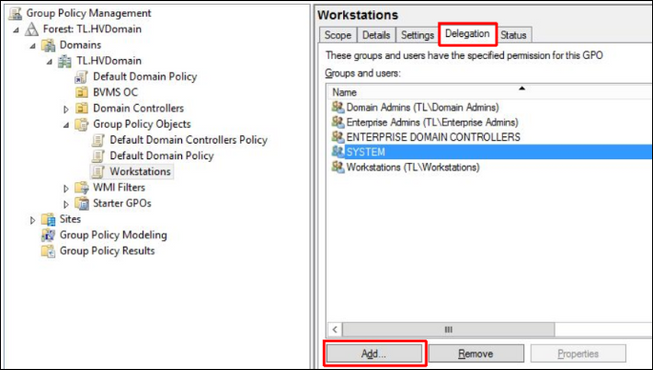
7. Enter the Authenticated Users and press OK. In the next dialog the permissions should be Read. Press OK.


2.3 Distribute CA certificate
1. CA certificate with its public key can be exported using CM. Under Preferences / Security click on the export button:

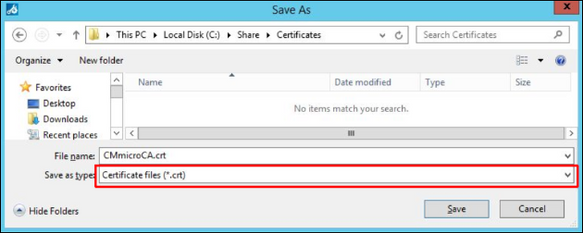
2. Export certificate as .crt file:
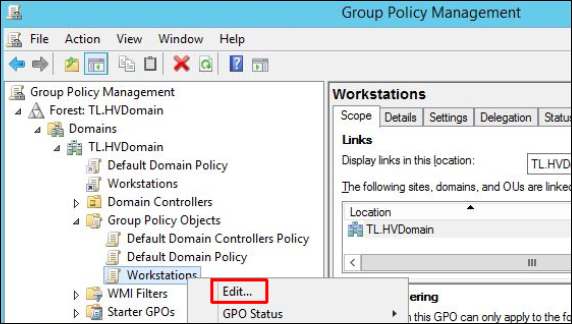
3. Go to Group Policy Management like described in the chapter "Configure a domain policy for workstations group", right click the Workstations Group Policy Object created in the chapter "Create AD computer group for BVMS Operator Client workstations" and select Edit:
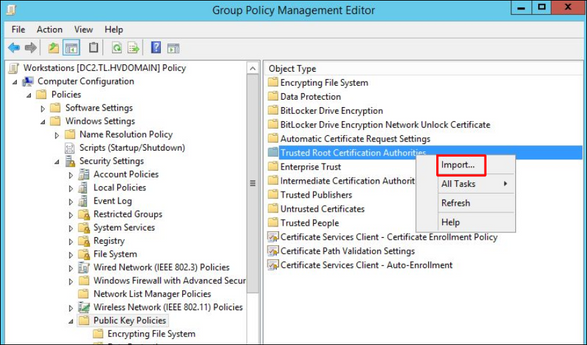
4. In the newly opened window on the left side navigate to Policies / Windows Settings / Security Settings / Public Key Policies, right click on the Trusted Root Certification Authorities on the right side and select Import:
5. In the Certificate Import Wizard leave the default settings and click Next:

6. Select the certificate exported in the step 2 and click Next:

7. Leave the default store to import the certificate – Trusted Root Certification Authorities – and click Next:

8. Review the selected options and click on Finish:

9. Once certificate was successfully imported it appears in the Group Policy Management Editor under Policies / Windows Settings / Security Settings / Public Key Policies / Trusted Root Certification Authorities:

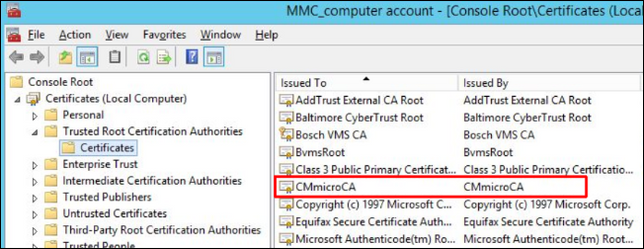
It takes some minutes till group policies are applied to all computers by domain. The distributed certificates can be found on every computer that belongs to the group Workstations in MMC console under Certificates / Trusted Root Certification Authorities / Certificates:
3. Restrictions
CM was tested with camera firmware 5.70 and newer. Older firmware is not supported.
Older cameras like platform CPP3 do not provide a possibility to assign certificates to HTTPs server in the signing request dialog as these devices do not support different server types yet.
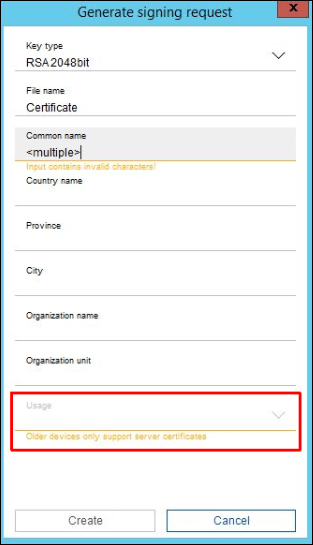
In case multiple HTTPS server capable and 1 incapable device are selected, the usage selection is disabled for all of them. Therefore it is recommended to create certificates separately for these 2 groups in order to avoid additional steps. Nevertheless, older device certificates created without usage are utilized for HTTPS connections and video authentication by the camera.
Glossary
AD Active Directory
BVMS Bosch Video Recording System
CA Certification Authority
CM Configuration Client
CSR Certificate Signing Request
DC Domain Controller
Still looking for something?
- Top Results
