- Top Results
- Bosch Building Technologies
- Security and Safety Knowledge
- Security: Video
- Can I move the BVMS Logbook database to a separate Microsoft SQL Server?
Can I move the BVMS Logbook database to a separate Microsoft SQL Server?
- Subscribe to RSS Feed
- Bookmark
- Subscribe
- Printer Friendly Page
- Report Inappropriate Content
Question
Can I move the BVMS Logbook database to a separate Microsoft SQL Server to ease maintenance or increase the size of the Logbook?
Answer
BVMS is using Microsoft SQL Server Express to store its logbook. Based on the information provided by Microsoft (Compare SQL Server 2017 editions), SQL Server Express is limited to a 10GB database size.
This could be insufficient for larger installations or installations that require a very long logbook retention time. Additionally, some organizations have a dedicated SQL server environment which should be utilized by all applications.
The BVMS Logbook database can be moved to another SQL Server. This guide describes the steps that are necessary to migrate the database and describes how to confirm if the migration was successful.
|
Knowledge Support |
Version
This guide is based on Microsoft Windows Server 2016 (fully updated on 2018-09-28) and Microsoft SQL Server 2017 (version 14.0.2002.14). The SQL Server should be installed in "Mixed mode" authentication (having an "sa" account) and this guide assumes an instance name "BVMS_External".
1. Preparing the SQL server
In the first step, the new SQL server is prepared for remote connections. This section assumes the SQL server has just been installed and the configuration is fresh. The instance name used in this guide is "MSSQLSERVER".
2. SQL server settings
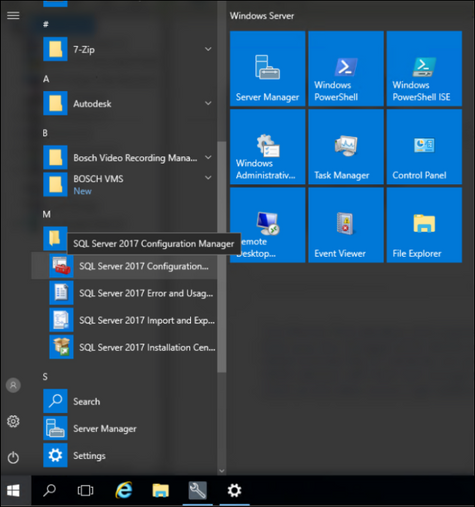
The SQL server can be configured using the SQL Server configuration manager, which can be started using the Windows start menu.
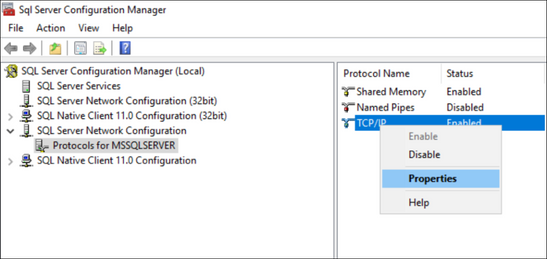
In this step, the TCP/IP protocol will be enabled for the network adapter which will be used to communicate with the BVMS management server. Browse to the SQL Server Network Configuration, Protocols for MSSQLSERVER.
Open the properties window of the TCP/IP protocol.
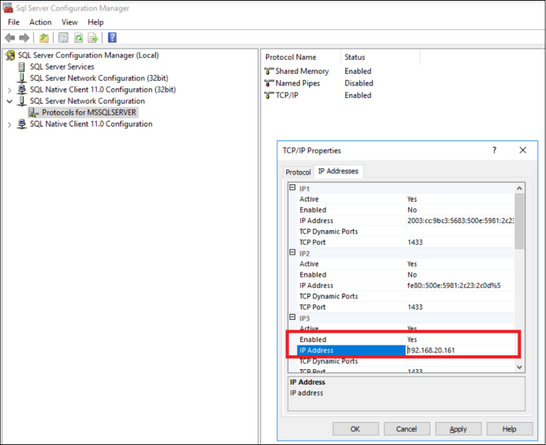
Go to the IP Addresses tab in the properties window, and find the network adapter (search for the correct IP address) which should be used for communication with the BVMS management server. Enable the SQL Service on this adapter by changing the Enabled option to Yes.
Restart the SQL Server (MSSQLSERVER) in order to apply the changes.
3. Firewall settings
In order to allow the SQL Server to communicate with the BVMS management server, the firewall needs to be adjusted.
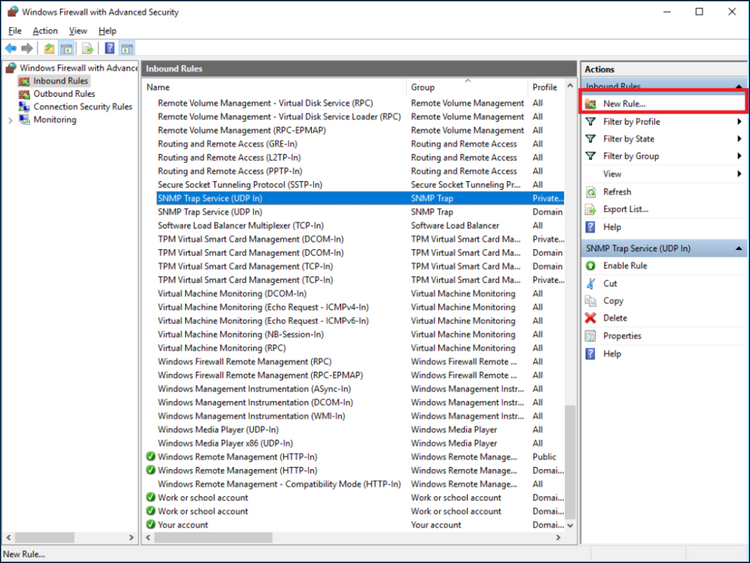
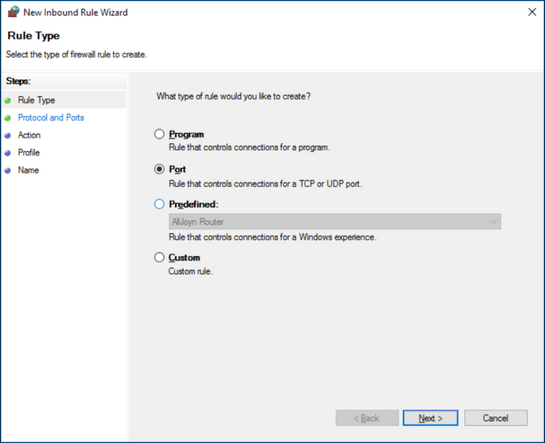
Open the Windows Firewall with Advanced Security and create a new firewall rule, as shown in the image below.
Create a new inbound rule for ports.
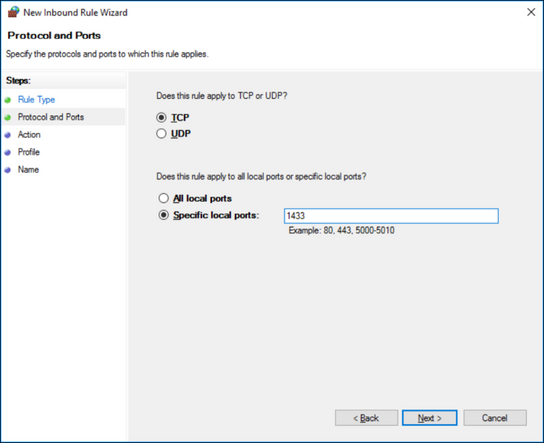
The SQL Server communicates based on TCP port 1433. Fill in the form as shown in the image below.
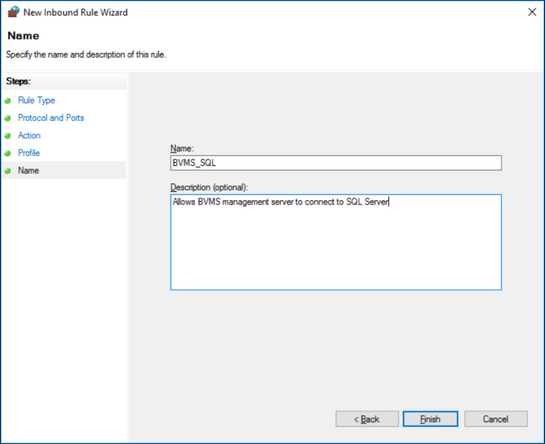
Move through the action (grant access) step and apply the rule for all firewall profiles (private, public, domain). Give the firewall rule an appropriate name.
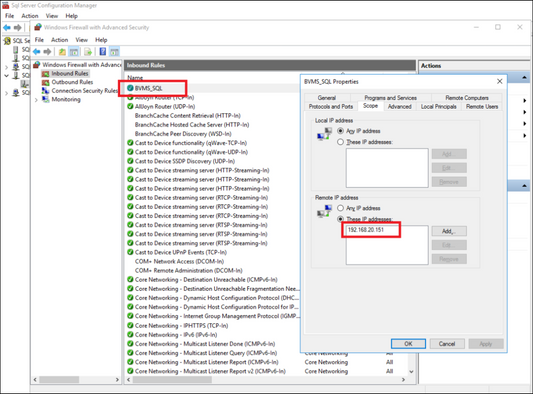
In order to increase the security level, the rule can be adjusted in order to only allow communication between the SQL Server and the BVMS Management server. Open the properties dialogue of the firewall rule, go to the Scope tab, and add the remote IP address of the BVMS Management server (the example below shows 192.168.20.151 as the BVMS Management server IP address.
In order to test the rule, the Microsoft SQL Server Management Studio should be able to login to the SQL server from the BVMS Management server using the "sa" account.
4. Moving data
Now that the SQL server has been prepared, the logbook database will be moved from the BVMS Management server to the SQL Server.
4.1. Stop BVMS SQL server instance
Open the SQL Server Configuration Manager on the BVMS Management server and Stop the SQL Server (BVMS) process.
4.2 Moving data
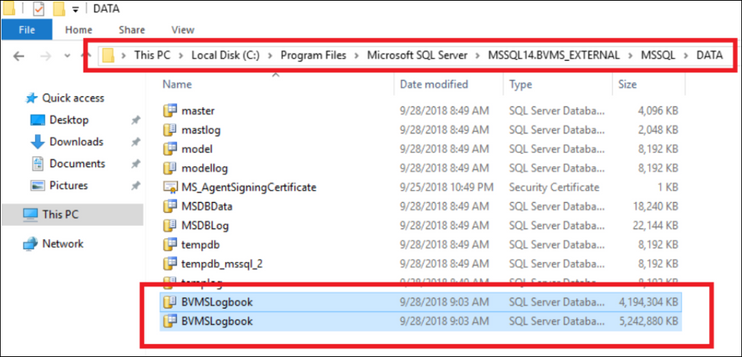
The logbook database is located in C:\ProgramData\Bosch\VMS\DB on the BVMS Management server. Copy the BVMSLogbook.mdf and BVMSLogbook.ldf (using a USB stick or using the network) to the SQL server.
The files should be copied to the
- C:\Program Files\Microsoft SQL Server\MSSQL.14.BVMS_External\MSSQL\DATA folder.
This folder location has the right permissions for the SQL Server to adjust these files. If another location is chosen, the database administrator needs to ensure the SQL server has the correct rights
4.3 Attaching database
After the database files have been moved, they need to be attached to the SQL Server process.
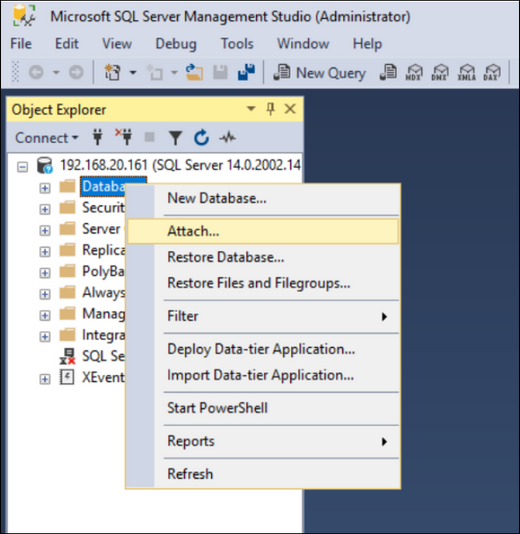
Login to the SQL Server using Microsoft SQL Server Management Studio on the BVMS Management server. Right click the Database folder and Attach a new database to the SQL Server.
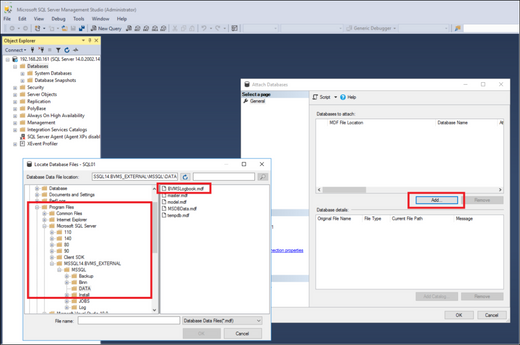
Browse to the C:\Program Files\Microsoft SQL Server\MSSQL.14.BVMS_External\MSSQL\DATA and select the BVMSLogbook database file.
The database should be attached to the SQL Server and it should appear in the tree.
4.4 Set the database size
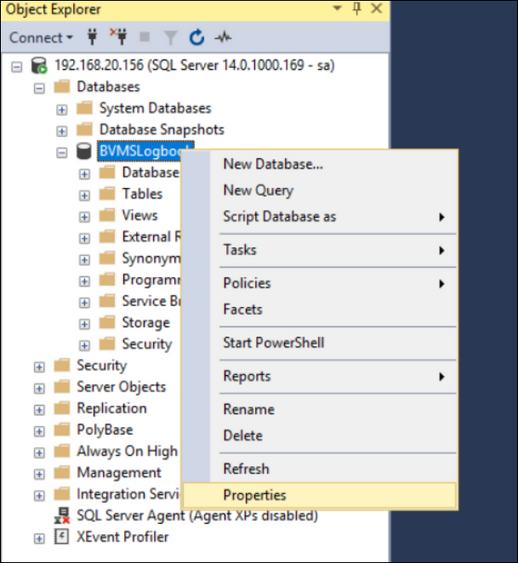
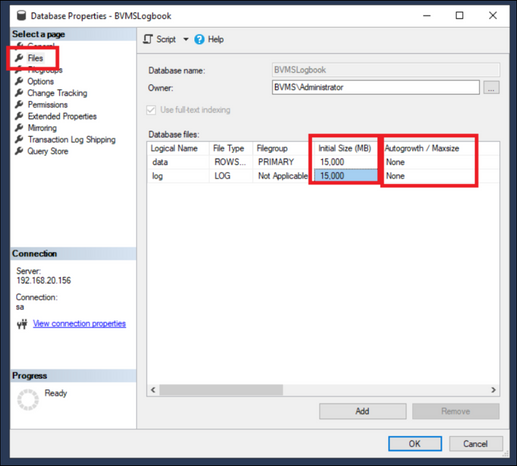
By default, the size of the BVMS logbook has been fixed to 4GB. To allow the logbook to grow, the size of the database needs to be changed. Right click the BVMSLogbook database in the SQL Server Management Studio and click properties.
Go to the Files page and change the Initial Size of the data and log files as required.
4.5 Confirming data migration
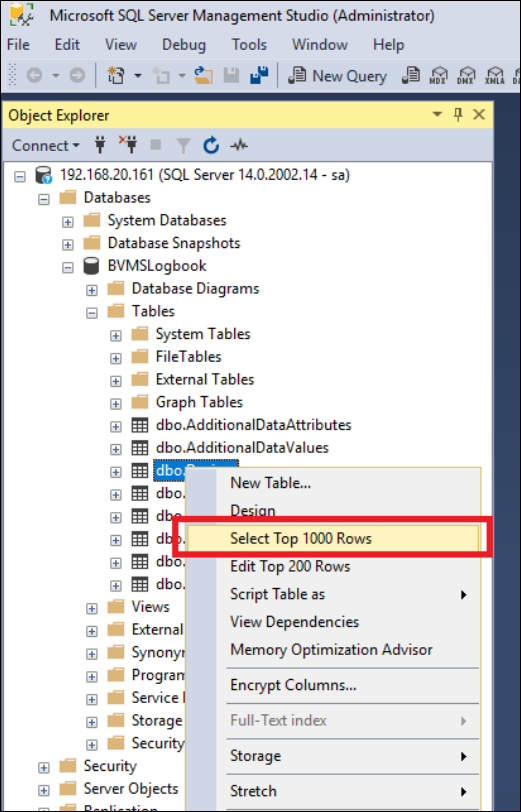
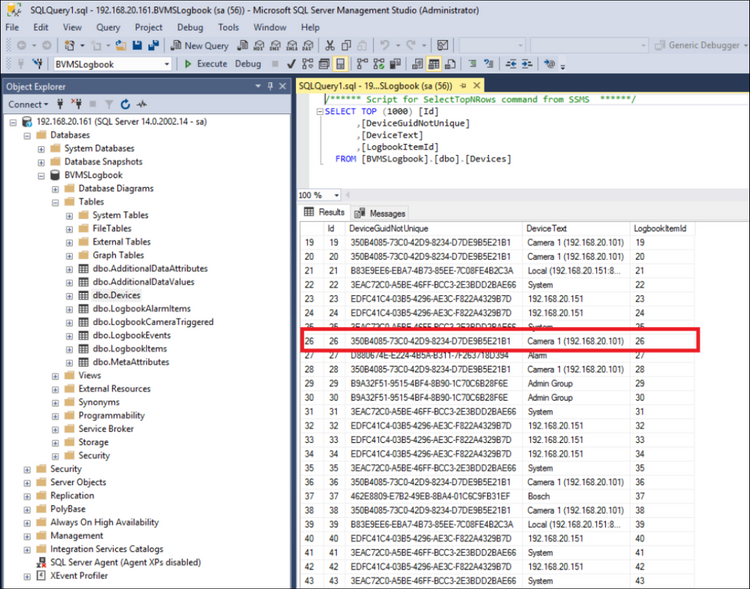
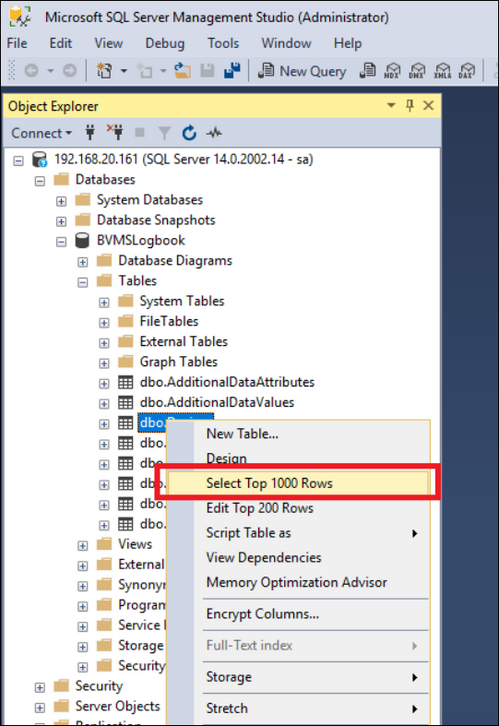
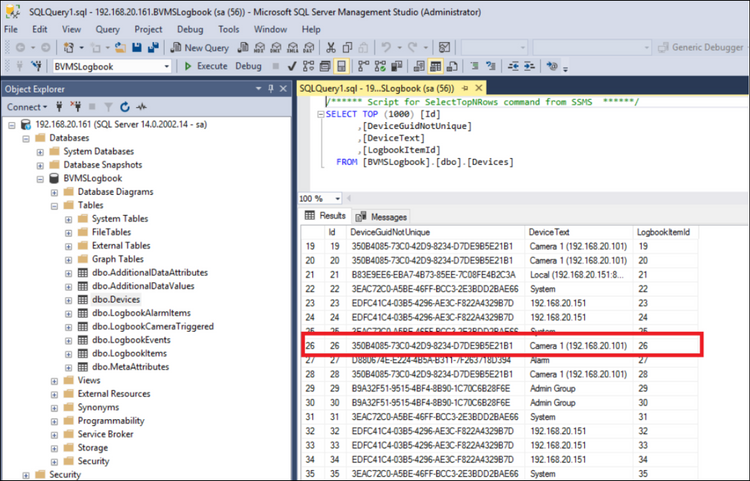
In order to confirm the data migration, the content of the database can be checked by executing a SELECT query on the data. Expand the BVMSLogbook database, go into the Tables folder, right click on the dbo.Devices and click on "Select Top 1000 Rows".
The result should show devices recognized from the BVMS configuration, as shown below.
5. SQL Server security
It is not recommended to use the "sa" account for BVMS to login to the SQL Server. In this section a separate SQL Server user account will be created.
5.1. Create user
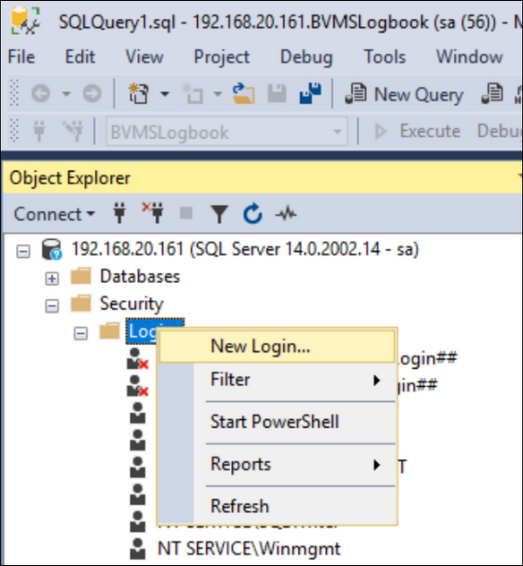
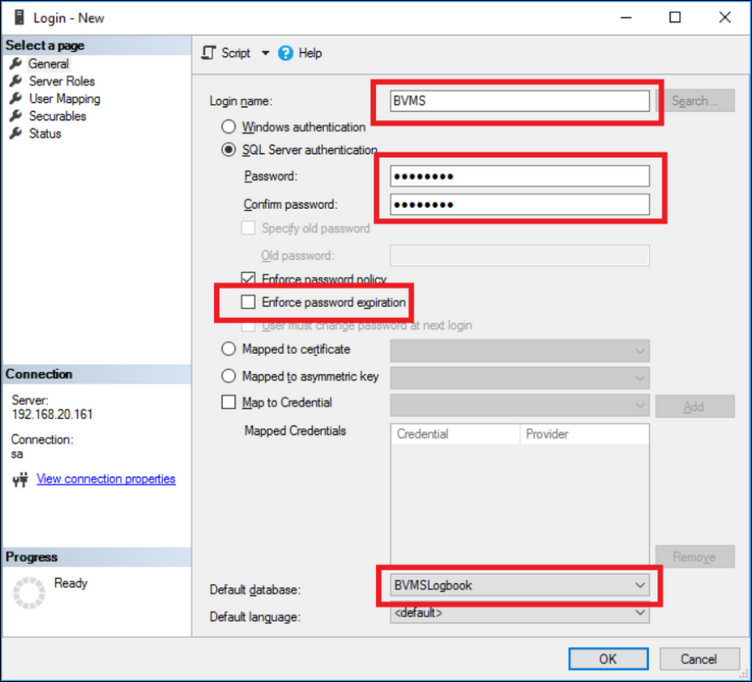
Browse to the Security - Login folder using the Microsoft SQL Server Management Studio. Create a new login as shown in the image below.
Fill the form with an appropriate user-name and password, deselect Enforce password expiration (in order to prevent the BVMS Management server to lose access once the password has expired) and select the default database (BVMSLogbook).
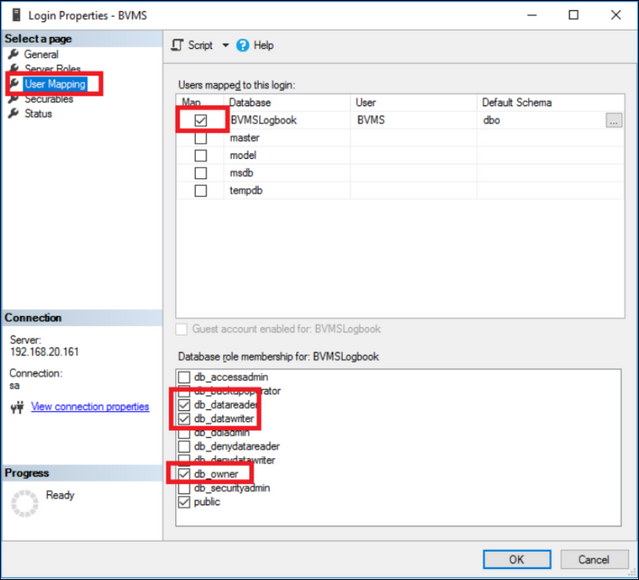
Go to the User Mapping tab, map the user to the BVMSLogbook database and enrol the user as db_datareader, db_datawriter and db_owner to the database.
Finish by clicking OK.
5.2 Verify user
Logout of the Microsoft SQL Server Management Studio. Login using the newly created user and verify if the user has access to the database.
The result should show devices recognized from the BVMS configuration, as shown below.
6. BVMS settings
Now that the database is configured and the access is tested, BVMS needs to be re-directed to the new location of the logbook database.
6.1 Change SQL connection string
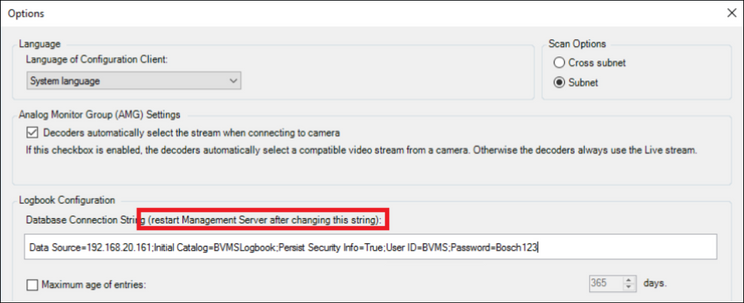
The SQL Connection string can be configured in the Options dialogue.
Change the SQL Server connection string based on the format and example below
| Data Source=YourDBServerAddress;Initial Catalog=DatabaseName;Persist Security Info=True;User ID=YourUserID;Password=YourPassword Data Source=192.168.20.161;Initial Catalog=BVMSLogbook;Persist Security Info=True;User ID=BVMS;Password=Bosch123 |
Restart the BVMS Management server after the configuration has been saved and activated.
6.2 Verify logbook connectivity
The last step is to verify the logbook migration in the BVMS Operator Client. Open the logbook search window, as shown in the image below.
When the migration has succeeded, the logbook should contain a historical overview of events, dated from before the migration of the database.
7. Upgrading BVMS
| Do not de-install SQL Server Express from the BVMS Management Server. This might cause the BVMS set-up to fail, when it used to upgrade the Management Server. The SQL Server Express services might be stopped during normal operations, but need to be started and running during the upgrade. |
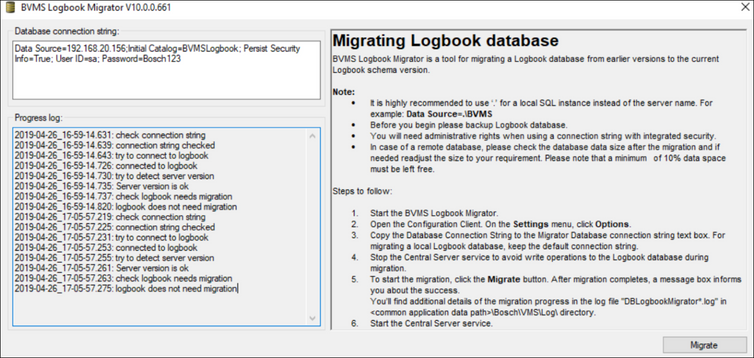
When a new BVMS release is created changed to the database schema might have been made. Normally, when using the embedded SQL Server, the database scheme is automatically upgraded . As the database is moved to a different server, the set-up mechanism cannot realize an upgrade of the schema of the remote database.
To allow system administrators to upgrade the database schema manually, the DbLogBookMigrator has been created. This tool can be found in the C:\Program Files\Bosch\VMS\bin directory (DBLogbookMigrator.exe). Start the tool, enter the SQL Server connection string (as entered in section 4.1) and start the migration process. The progress log will show an indication of the result.
8. SQL running on a different HDD than default one (C:)
 By default, BVMS installs both SQL Server and the SQL instance "BVMS" on the main OS drive (typically - C:\). Currently, there's no option available to change this setting during the installation. By default, BVMS installs both SQL Server and the SQL instance "BVMS" on the main OS drive (typically - C:\). Currently, there's no option available to change this setting during the installation. |
In some cases it might be preferred to have all the SQL Server files installed on a hard drive different than C:. This chapter provides step-by-step procedure to achieve this goal.
8.1. Install the SQL Server separately (before the BVMS setup is started)
When installed SQL Server using a separate setup, it is possible to define the specific folder where SQL Server files will be stored. Run the setup and define the target location where SQL Server files should be installed.
Install an empty SQL instance called "BVMS".
 In order to guarantee compatibility, please use the same MS SQL Server version as used by your target BVMS version. (please refer to the corresponding BVMS Release Notes) In order to guarantee compatibility, please use the same MS SQL Server version as used by your target BVMS version. (please refer to the corresponding BVMS Release Notes) |
8.2. Run the BVMS installation
Once the SQL instance is installed, start the BVMS installation using the standard setup files. If BVMS setup detects the existing SQL instance BVMS, it will automatically use it instead of installing the new instance.
 During the BVMS setup, existing SQL instance will be used and database schema will be applied. However, DB files will be stored at the default location of C:\ProgramData\Bosch\VMS\DB. In order to completely move SQL files from the C: drive, database files shall be moved in the next step. During the BVMS setup, existing SQL instance will be used and database schema will be applied. However, DB files will be stored at the default location of C:\ProgramData\Bosch\VMS\DB. In order to completely move SQL files from the C: drive, database files shall be moved in the next step. |
8.3. Move the database files
Please follow the same steps as described in the chapter 4. Moving data of this document. Instead of moving the DB files to a separate machine, store them on the target hard drive of the server.
9. Troubleshooting
If the migration has failed the BVMS Operator Client will report it is not able to access the database. This could have several root-causes.
The connectivity between the SQL Server and BVMS Management server can be tested using general network troubleshooting tools, like ping (take care of the firewall configuration!). Additionally the firewall can be temporarily disabled to verify if it has been configured correctly. The Microsoft SQL Server Management Studio should be able to login from the BVMS Management server to the SQL Server. Last, the user account which has been created should have the correct roles on the database.
Still looking for something?
- Top Results
