Bosch Building Technologies

    cancel
    Showing results for 
    Search instead for 
    Did you mean: 

    How to enable web server configuration for PRA-ES8P2S?

    In order to prevent security breaks, the PRA-ES8P2S network switch is by default not reachable via web interface.
    If needed, it can be configured via the serial console port. Additionally via this console port, the web server can be activated, so the switch can be configured via the web GUI.

    Please disable the web server after the configuration was completed!

    This description is also available in the configuration manual v1.60, chapter 5.3.7.

    Step-by-step guide


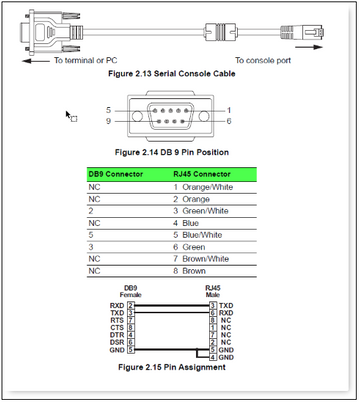
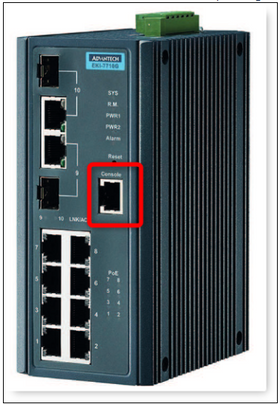
    1. connect your PC to the Console Port of the powered switch, the PC most probably won't have a serial port, in that case use an USB-to serial convertor. The console port of the switch is a RS-232 serial port, but it is a RJ-45 socket. Here is the pinning of an adapter cable
    CentralSupport_0-1670939249841.pngCentralSupport_1-1670939280872.png
    2      On the PC, start a terminal program like uCon or Putty.

         Locate the COM Port of the converter (at Computer Management, Device Manager), in this example, it is COM5.

    4       Setup the connection with following settings:
              – Bits per second (BAUD): 115,200.
              – Number of bits: 8.
              – Parity: None.
              – Stop bits: 1.

    CentralSupport_2-1670939412872.png

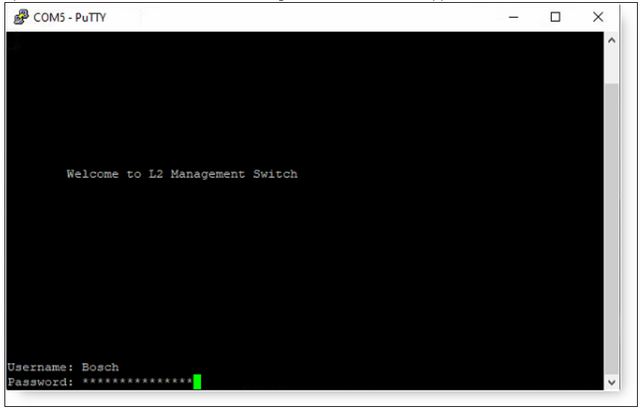
    5       Open the connection, "Welcome to L2 Management Switch" should appear
    CentralSupport_3-1670939476357.png
    6       Enter the default credentials from the manual. Username: Bosch, Password: mLqAMhQ0GU5NGUK.
    7       A promt appears with switch#
    8       To go to the settings, type "conf", press Enter.
    9       To enable web server via https, type "ip https", press Enter. If neede also enable http, type "ip http".
    10     Exit the settings, type "exit", press Enter.
    11     Save the settings, type "save", press Enter. The Terminal window should look like this now:
    CentralSupport_4-1670939665249.png
    12     Reboot the switch, type "reboot", press Enter.
    13     Now you can access the switch via web interface at Ip address https://169.254.255.1/
    14     Log on via the known credentials (see step 6)
    15     After the desired settings are done, disable the web server again like decribed above, but use the terms "no ip https" and "no ip http".


    Version history
    Last update:
    ‎12-13-2022 03:04 PM
    Updated by:
    Contributors
    Icon--AD-black-48x48Icon--address-consumer-data-black-48x48Icon--appointment-black-48x48Icon--back-left-black-48x48Icon--calendar-black-48x48Icon--center-alignedIcon--Checkbox-checkIcon--clock-black-48x48Icon--close-black-48x48Icon--compare-black-48x48Icon--confirmation-black-48x48Icon--dealer-details-black-48x48Icon--delete-black-48x48Icon--delivery-black-48x48Icon--down-black-48x48Icon--download-black-48x48Ic-OverlayAlertIcon--externallink-black-48x48Icon-Filledforward-right_adjustedIcon--grid-view-black-48x48IC_gd_Check-Circle170821_Icons_Community170823_Bosch_Icons170823_Bosch_Icons170821_Icons_CommunityIC-logout170821_Icons_Community170825_Bosch_Icons170821_Icons_CommunityIC-shopping-cart2170821_Icons_CommunityIC-upIC_UserIcon--imageIcon--info-i-black-48x48Icon--left-alignedIcon--Less-minimize-black-48x48Icon-FilledIcon--List-Check-grennIcon--List-Check-blackIcon--List-Cross-blackIcon--list-view-mobile-black-48x48Icon--list-view-black-48x48Icon--More-Maximize-black-48x48Icon--my-product-black-48x48Icon--newsletter-black-48x48Icon--payment-black-48x48Icon--print-black-48x48Icon--promotion-black-48x48Icon--registration-black-48x48Icon--Reset-black-48x48Icon--right-alignedshare-circle1Icon--share-black-48x48Icon--shopping-bag-black-48x48Icon-shopping-cartIcon--start-play-black-48x48Icon--store-locator-black-48x48Ic-OverlayAlertIcon--summary-black-48x48tumblrIcon-FilledvineIc-OverlayAlertwhishlist