- Top Results
- Bosch Building Technologies
- Security and Safety Knowledge
- Security: Intrusion
- How to Add or Change Passcodes in 2000 Series Panels.
How to Add or Change Passcodes in 2000 Series Panels.
- Subscribe to RSS Feed
- Bookmark
- Subscribe
- Printer Friendly Page
- Report Inappropriate Content
Preliminary:
The 2000 series panel contains 8 user passcodes and 1 installer code. Each user is assigned a type and passcode. The ‘type’ determines the functions allowed by entering the passcode.
Passcodes and Passcode Length:
- The default user passcode is [123456]. When using 3 digit passcodes (default setting) use [123].
- The default Installer code is [654321]. When using 3 digit passcodes (default setting) use [654].
How to change existing Passcodes:
Press 5 at the keypad to change an existing passcode. These steps only change a passcode and cannot add a new passcode.
- Passcodes use between 3 and 6 digits and default settings are configured for 3 digits. Passcode Length is configured in the Passcode area of the panel program.
1. Press 5. The keypad responds: Enter Old Code.
2. Enter the passcode to be changed. The keypad responds: Enter New Code.
3. Enter the new passcode using the same number of digits as the original passcode. The keypad responds: Enter New Again.
4. Enter the new passcode again to complete the passcode change.
How to control authority for passcode changes from the keypad.
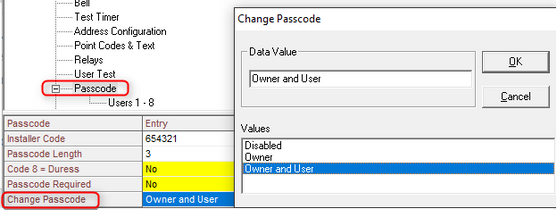
Authority to Changing passcodes by pressing 5 at the keypad in controlled by the ‘Change Passcode’ setting in the Passcode area of the panel program. The default setting is Owner and User, allowing all users to change passcodes by pressing 5. The available authority options for ‘Change Passcode’ are described below.
- Owner and User- (Default setting) Allows both owner and user passcode 'types' to change passcodes from the keypad.
- Owner- Allows only owner type passcodes to change passcodes from the keypad.
- Disabled- Prevents any user from changing the user's passcode from the keypad.
NOTES:
- Prevent standard users from changing passcodes by selecting Disabled.
- When passcode changes performed by pressing 5 at the keypad are not allowed, the ‘Change Passcode’ setting should be checked for the proper setting required by the site.
How to add a New Passcode:
Passcodes are added to 2000 series panels by first selecting the required user ‘Type’ and then adding a passcode.
1. Press 6. The keypad displays; [Enter the owner’s code to modify codes] and scrolls through the currently selected user type for each of the 8 available codes.
2. Enter the Owners code: (default: 123). The keypad responds with:
- Push 9 to Renew all One-Time Codes.
- Press 1 to Change Code Types.
- Press 0 to Change Codes.
- Press Clear to Exit.
3. Press 1 to change code Types - The keypad displays: [Select Code (1-8)]. Select a code to modify.
4. The keypad displays the current Type for the selected passcode and scrolls the available Type options. Select a code Type for the user. The default Type for user 1 is Owner and for users 2-8 is Disabled.
- Select 1 for Owner.
- Can perform all user functions as well as changing code types and passcodes for all users. Owner type is required for configuring Watch Tone responses and creating new passcodes.
- Select 2 for User.
- Can perform all user functions except; can only change the user’s own passcode. Cannot change passcode Types or adjust Watch Tone responses.
- Select 3 for One-Time code.
- Can disarm the system one time. All other system functions are available. One-Time passcodes can only be reactivated by owners.
- Select 4 for Disabled.
- Passcode is unused.
5. Press 0 to change the passcode. The keypad responds with: [Select Code (1-8)].
6. Select the user to change. The keypad displays: [Enter new code].
7. Enter new code, the keypad displays: [Enter new code again]. Enter the new code again to complete the code change.
Still looking for something?
- Top Results
