- Top Results
- Bosch Building Technologies
- Security and Safety Knowledge
- Security: Intrusion
- How to troubleshoot Database Connection Failed error when opening RPS.
How to troubleshoot Database Connection Failed error when opening RPS.
- Subscribe to RSS Feed
- Bookmark
- Subscribe
- Printer Friendly Page
- Report Inappropriate Content
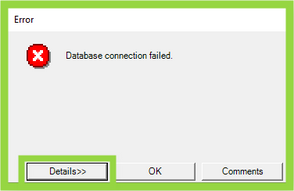
When Remote Programming Software opens, a secure connection is made to the database which is located in an instance of SQL. If the connection to SQL is not successful or the database is not accessible, the Database connection failed error will display (see figure 1).
Figure 1 Database connection failed error
- This article discusses some possible causes for the database connection to fail, select Details for more information.
- Some common causes for the database connection to fail are; failure to connect to the SQL Server, failure to open the database or failure to authenticate the user (see figure 2).
Figure 2 Three common causes for the database connection failure
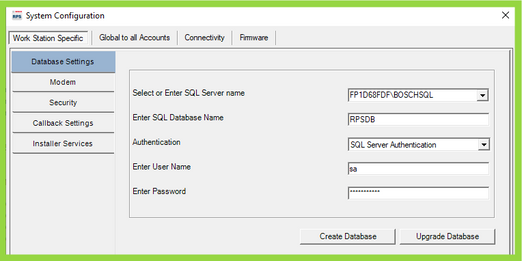
- Review the information displayed in details, then select OK to open the Database Settings Page (see figure 3). This page may also be accessed by selecting Config and System from the front page of RPS.
- Note the following settings which are applied during a basic installation of RPS;
- SQL Server Name: The Computer Name followed by back-slash [\] and the name of the SQL instance where the database is located, e.g. [computer-name\SQL Instance Name]. The default SQL instance name is BOSCHSQL.
- SQL Database Name: The name of the database used by RPS. The default database name is RPSDB.
- Authentication: The method for authenticating the database connection. The default entry is SQL Server Authentication.
- User Name: The user authenticated to allow connecting to the SQL database. The default entry is 'sa' (system administrator).
- SQL Authentication Password: The password used to authenticate the SQL database connection. The default password used in the default installation is;
- RPS version 6.10 and newer: B@SCHRPSsql12345
- RPS versions 6.09 and earlier: RPSsql12345.
- Instructions for correcting an unknown sa password are included later in this article.
Figure 3 System Configuration Page
1. Failure to connect to the SQL Server. Details displays:
“A network-related or instance-specific error occurred while establishing a connection to SQL Server. The server was not found or was not accessible. (Provider: SQL Network Interfaces, error: 26 – Error Locating Server\Instance Specified).”
In this case the connection to the SQL Server has failed causing the database connection to fail. Press OK and return to the Database Settings page. Troubleshoot using the following steps;
- Check for a correct SQL Server name entry with the following format; [computer-name\SQL Instance Name]. Be sure that a backslash [\] is used between items.
- [Computer-name] represents the name of the computer with SQL installed.
- [SQL Instance Name] represents the name of the SQL Instance where the RPS database is located. Note that there may be more than one instance of SQL on the PC. The correct instance name must be entered here.
- Open Computer Services using the steps below to verify; 1) SQL is installed, 2) the correct instance name is entered in Database Settings, and 3) the related service is running.
- Right-click on This PC or Computer and then select Manage and Computer Management opens.
- Select Services and Applications and then select Services to open Computer Services (see figure 4).
- Figure 4 How to access Services and Applications
- A list of computer services displays as in figure 5. Identify the SQL Server service with the RPS database, e.g. SQL Server (instance-name) from the list. Verify this instance name was entered correctly in the Database Settings page under System Configuration (see figure 3). If the service is not listed, then the instance is not installed on this PC.
-
- Figure 5 Locate the SQL Service
- Note the Status and Startup Type for the Service. If status does not display Running, right-click on the service and select Start. If the Startup Type does not show Automatic it must be changed from the properties page. Access the properties page by double-clicking on the SQL Server service. Select Automatic from the drop-down list in the properties page as displayed in figure 6.
Figure 6 Verify the Service is running and Startup is Automatic
-
- Verify Microsoft SQL Server Native Client is installed on the PC running RPS. Microsoft SQL Server Native Client can be downloaded from the link: https://www.microsoft.com/en-us/download/details.aspx?id=50402
- Beginning with version 6.07, RPS makes an encrypted connection to SQL, therefore TLS 1.2 must be supported on the computer. The following links may be used to verify encryption is supported;
- https://docs.microsoft.com/en-us/sql/database-engine/configure-windows/enable-encrypted-connections-...
- https://support.microsoft.com/en-us/help/3135244/tls-1-2-support-for-microsoft-sql-server
- Note that encryption must be supported on both the Client and Server PCs when SQL is located on a remote computer.
- Verify a functional network connection between the Client computers to the Server computer when SQL is located on a remote computer.
2. Failure to open the database. Details will display;
“Cannot open database “[database name]” requested by the login. The login failed. Login failed for user ‘sa’”.
In this case the database failed to open after the connection was made to SQL. Press OK and return to the Database Settings page. Troubleshoot using the following steps;
- Verify the Database Name entry is correct.
- Navigate to the following path and note the name in brackets and verify it was entered correctly in Database Settings;
- C:\Program Files (x86)\Microsoft SQL Server\MSSQL11.BOSCHSQL\DATA\[database name]
- Navigate to the following path and note the name in brackets and verify it was entered correctly in Database Settings;
- Press Upgrade Database. This updates the database tables as well as verifies correct ability to ‘write’ data to the database.
- Verify the RPS installation was executed by right-clicking on the installation file and selecting ‘run as administrator’ (see figure 7 ). This permits the system to make required changes to the registry as well as grant read/write permissions to files & folders where needed.
Figure 7 Install with Administrator Privileges
- Attempt to create a new database. As a possible last resort, this will validate that the login method had the ability to create a new database and has write permissions to update tables.
3. Failure to authenticate the user: Details will display;
“Login failed for user sa”.
The user “sa” is used when the database connection is made using SQL Server Authentication. There are two likely causes for the SQL Server user sa to fail. The sa password may either be incorrect or fails to meet domain requirements for complex passwords (if required). It may also be occur if the SQL installation was not configured for Mixed Mode.
Press OK to return to the Database Settings page. Troubleshoot using the following steps;
-
- Manually enter the default user name and password loaded with a basic install of RPS;
- RPS version 6.10 and newer using SQL Server 2017: B@SCHRPSsql12345.
- RPS versions 6.09 and earlier using SQL Server 2012: RPSsql12345.
- Manually enter the default user name and password loaded with a basic install of RPS;
- Change Authentication from SQL Server Authentication to Windows Authentication in Database Settings.
- Use Microsoft SQL Server Management Studio to verify a correct password is used, or to create a new password which satisfies the domain requirements for complex passwords. Examples are;
- Minimum number of characters.
- Upper case characters.
- Lower case characters.
- Numbers between 0-9.
- Non-alphabetic (special) characters (for example, !, $, #, %)
Download and install Microsoft SQL Server Management Studio (SSMS).
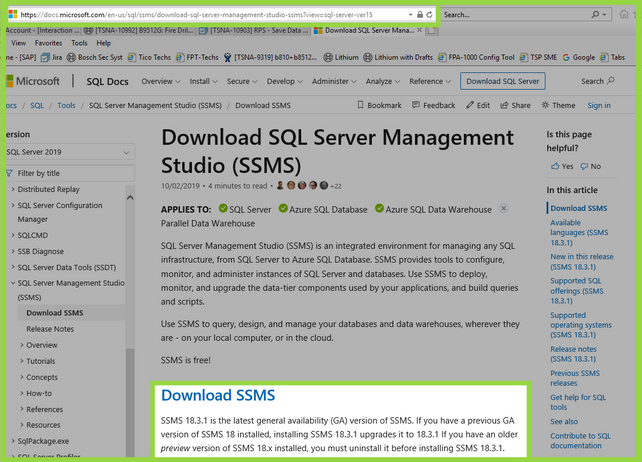
- Go to the SSMS installation page in a browser with the following link: https://docs.microsoft.com/en-us/sql/ssms/download-sql-server-management-studio-ssms?view=sql-server...
Figure 8 Download SSMS
- Click the Download SQL Server Management Studio link.
- Right-click the downloaded SSMS setup file and select Run as Administrator.
- Follow the on-screen prompts to install SSMS.
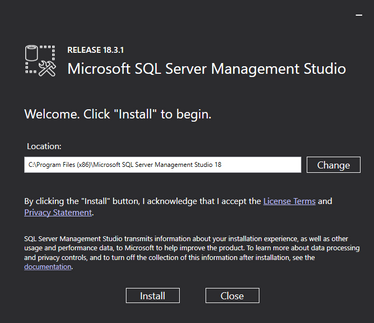
Figure 9 Welcome to install screen
- Select Install.
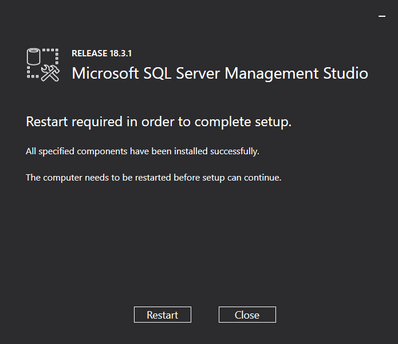
- Select Restart to complete the installation(see figure 10).
Figure 11 Open Management Studio
- Open SQL Server Management Studio (see figure 11).
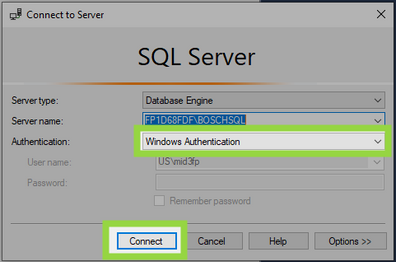
Figure 12 Log in using Windows Authentication
- The Connect to Server dialog opens. Select Windows Authentication and then select Connect to log into the server's dashboard (see figure 12).
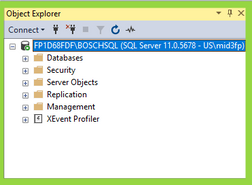
Figure 13 Object Explorer
- SQL Server opens to the Object Explorer page with configuration options (see figure 13).
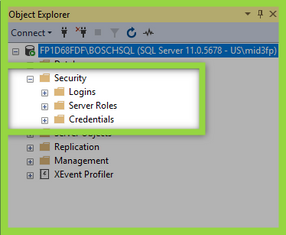
Figure 14 Object Explorer Security expanded
- Double-click on Security or click on [+]to expand the folder (see figure 14).
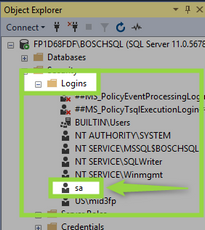
Figure 15 Object Explorer Logins Expanded
- Double-click on Logins or click on [+]to expand the folder and then double-click on the user; sa (system administrator) to open the Login Properties page (see figure 15).
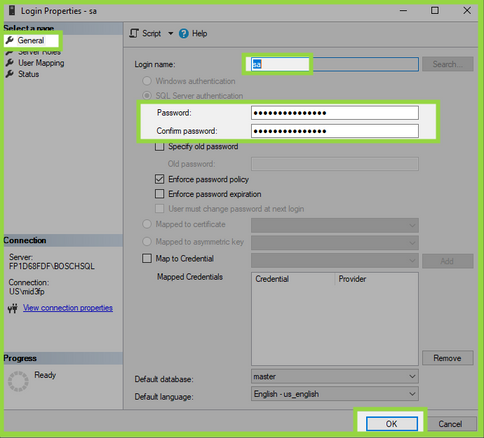
Figure 16 Login Properties sa password
- The login properties for user: sa opens to the General page. Enter the default password in Password and enter again in Confirm Password. The default password is recommended to assist Bosch Technical Support when needed.
- For SQL 2012 enter: RPSsql12345.
- For SQL 2017 enter: B@SCHRPSsql12345.
- Select OK at the bottom of the page.
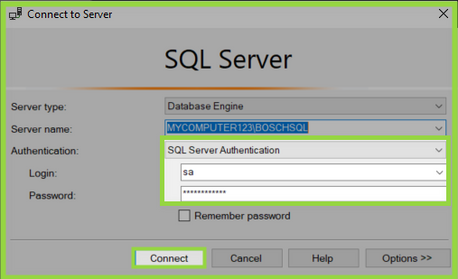
- Test the new sa user password by logging out of the Object Explorer and then logging back in with SQL Authentication Mode and the new sa password.
- Press File > Disconnect Object Explorer, and then File > Connect Object Explorer.
Figure 17 Connect to server with SQL Server Authentication
- Enter the new password and press Connect.
- If the error “Login failed for user sa” still displays, the problem may be occurring because the SQL installation was not configured for Mixed Mode. Use the following steps to configure SQL for Mixed Mode.
- Change Authentication from SQL Server Authentication to Windows Authentication and press Connect (see figure 12).
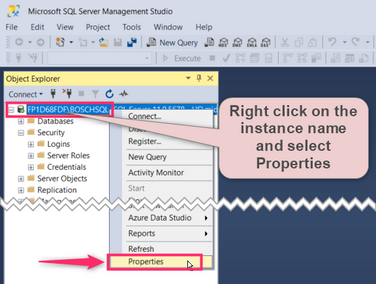
- Right click on the instance name ([computer name\BOSCHSQL]) or ([computer name\BOSCHSQL2017]) and select properties (see figure 18).
- Figure 18 Access Properties for the SQL instance
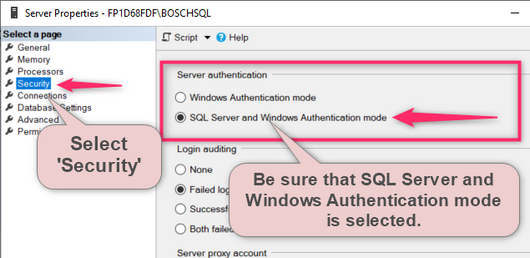
- Select SQL Server and Windows Authentication mode (see figure 19).
Figure 19 Select SQL Server and Windows Authentication Mode
Note that the overall settings in Microsoft SQL go beyond the scope of this article. The assistance of a qualified SQL administrator may be needed when the steps in this article have not resolved the "Database Connection Failed" error.
Still looking for something?
- Top Results
