- Top Results
- Bosch Building Technologies
- Security and Safety Knowledge
- Security: Intrusion
- Who rated this article
Who rated this article
How to program a Point Profile or Point Index in G Series or B Series control panels.
What is a Point Profile or Point Index and how are they programmed?
- A ‘Point Profile’ or Point Index’ is the set of parameters that define how the panel will behave when an input point becomes faulted. Either of the labels Profile or Index refer to the same set of settings. B8512G, B9512G and B-series types use the term Profile and older types use the term Index.
- Only one Profile/Index is needed for all of the same type of input points. For example, all of the perimeter delay doors would use a single Profile/Index. An additional Profile/Index is created only when minor differences exist between points. For example, when different entry delay times are required for the front door versus the back door. In this case a second Profile/Index is created with all of the same settings except entry delay.
- The ‘Point Type’ and ‘Point Response’ are the most important settings in the profile/index. The ‘Point Type’ determines the purpose of the input and whether it’s controlled by arming and disarming or if it’s always armed (24hrs). The 'Point Response' determines how the panel will behave when the input changes from normal to Short or Open. Depending on which Point Response is selected, an instant alarm, entry delay, supervisory or trouble will be generated.
- When writing a new program, always start by selecting the profile/index with a point type and response that most closely meets the requirements of the protected device. The default settings in the panel account includes all of the most common types of points. Only minor changes may be required during programming such as entry delay time, bypassable (yes/no), etc.
- Programming help is available by pressing F1 on a selected parameter in RPS.
- Descriptive text to assist in profile/index selection is included in the program however, it is modified only by the programmer. It is advisable to update this field when changes are made to avoid confusion.
- Point Profile Text is located at the top of each profile in B8512G, B9512G and B-series types. Older panels contain the field Point Index Descriptions in an area under Point Indexes.
How to configure a Point Profile in B8512G/B9512G and GV4 version 2+ panel types.
Figure 1 Point Profile Text in B8512G/B9512G and B-series.
1. Select an appropriate Point Profile to assign to a group of points such as Interior Instant Motions, Perimeter Delay Doors, Panic points or Smoke Detectors.
a. Review the Point Profile Text for a profile nearest to the type of point to be programmed and make minor changes when needed.
b. When unsure of the current point profile settings, follow the steps below to inspect for correctness.
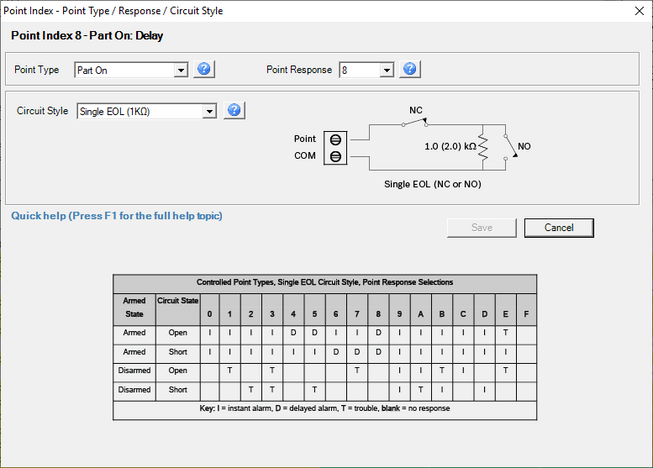
2. Double-click the Point Type/Response/Circuit Style field to view the Point Type, Point Response and Circuit Style configuration. The example in figure 2 (below) describes this page with an example of an Interior Delay point.
a. Click on the question mark 

Figure 3 Point Assignments Page.
3. Figure 3 (above) describes the final step in assigning the Point Profile to points in the Point Assignments area of the program.
How to configure a Point Index in D7212/D7412/D9412/G-GV4 Version 1.x panel types:
Figure 4 Point Indexes/Descriptions for D7212/D7412/D9412G thru GV4 Ver 1.x types.
1. Select an appropriate Point Index to assign to a group of points such as Interior Instant Motions, Perimeter Delay Doors, Panic points or Smoke Detectors.
a. Click on Point Index Descriptions under ‘Points’ for descriptions of the pre-programmed settings. Identify a point index nearest to the point to be programed and select it under Point Indexes 1-16 or 17-31. Note that Point Index Descriptions text must be modified each time settings are changed to accurately describe the profile.
b. When unsure of the current point profile settings, follow the steps below to inspect for correctness.
2. The Point Type and Point Response define the primary configuration of the index.
a. Select the Point Type and press F1 for help on the available point types and the below screen will display. Select any of the displayed types for programming help.

b. The Point Response defines how the panel responds when the point changes from Normal to an Open or Short condition. Select the Point Response and press F1 to view the Point Response tables. These tables show each available selection for controlled (non-24-Hour) point types and 24-Hour point types.
Figure 6 Point Response tables for Controlled points.
- Figure 6 (above) shows the point response table used for Controlled (Non-24 Hour) Points that follow the armed or disarmed state of the area where they are assigned. For example: Point Type 1 and Point Response 4 would be used for a Perimeter Delay door that provided a Delay when the circuit state became Open. A short condition would generate an Instant alarm. These options are used in default settings for point index 25 and are intended for a perimeter delay door.
Figure 7 Point Response tables for 24 Hour points.
- Figure 7 (above) shows the point response table used for 24 Hour points which are always armed regardless of the assigned area's armed or disarmed state.
For example: Point Type 0 and Point Response 1 would be used for a 24 Hour point that would generate an Instant alarm when the circuit state became shorted. An open state would generate a trouble. These options are selected in the default settings for point index 2 and would be used for a panic point.
Figure 8 Point Assignment programming.
3. Figure 8 (above) describes the final step in assigning the Point Index to points in the Point Assignments area of the program.
Still looking for something?
- Top Results


