- Top Results
- Bosch Building Technologies
- Security and Safety Knowledge
- Fire
- Avenar Panel - ETH Network firmware update via SD card
Avenar Panel - ETH Network firmware update via SD card
- Subscribe to RSS Feed
- Bookmark
- Subscribe
- Printer Friendly Page
- Report Inappropriate Content
Efficient way to update the panel firmware in an AVENAR panel 4.x network via SD card, thus keeping downtime of the panels to a minimum.
The following steps describe an efficient way to update the panel firmware in an AVENAR panel 4.x network via SD card, thus keeping downtime of the panels to a minimum. To further reduce downtime,
it is recommended to network the panel nodes via ETH.
Step-by-step guide
In the example below we will update four nodes from firmware 3.2.2 to firmware 4.0.2, one of which is redundant (1.1).
It is irrelevant which panel node you start with.
Note: A firmware update might require an update of the OPC server if the panel network is connected to a BMS.

Let’s get started.
1. Copy the 4.0.2 AVENAR panel firmware (*.swu) to one or several SD cards (FAT32)

2. Starting with node 1.1, insert the SD card into the redundant panel’s memory card slot.
3. Power down the main node via its power switch.
4. As soon as the redundant node reboots, place your finger immediately on the screen and wait until the boot menu appears

5. Select “Load new firmware from memory card”
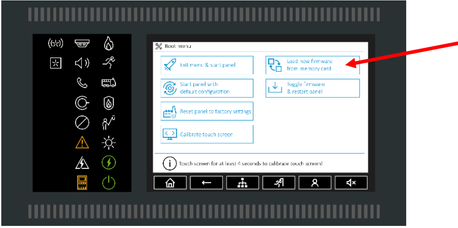
6. The panel screen will display the progress. Once the screen displays “Please touch screen to exit!” eject the SD card. Follow the instructions and touch screen to continue.
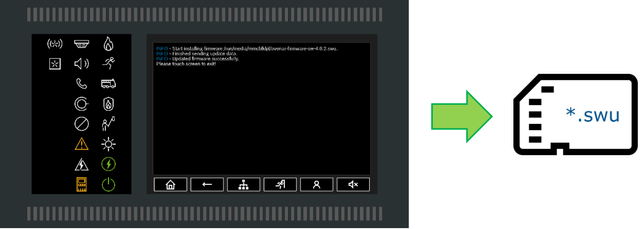
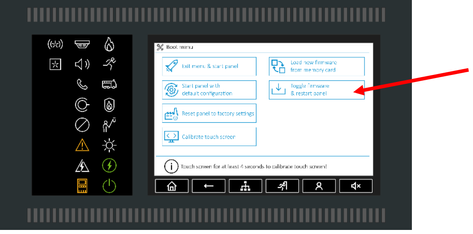
8. The redundant node will reboot, running on firmware 4.0.2 with default configuration.
9. Now insert the SD card into the main panel nodes memory card slot.
10. Power up the main panel node and immediately place your finger on the screen. Wait until the boot menu appears and select “Load new firmware from memory card”.
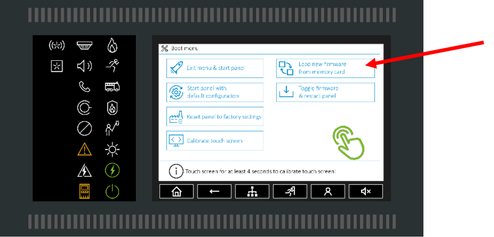
11. The panel screen will display the progress. Once the screen displays “Please touch screen to exit!” eject the SD card. Follow the instructions and touch screen to continue.
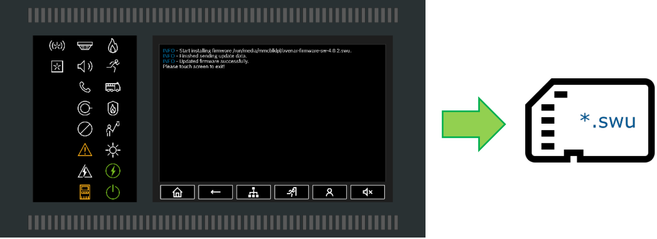
12. Back in the boot menu select “Exit menu & start panel”
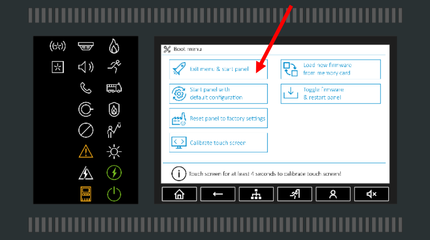
13. The main panel node will reboot running on its current 3.2.2 firmware and corresponding configuration. The panel is fully operable communicating with all neighboring panel nodes.
14. After all faults have been reset, the panel will display the fault message “SW incompatible ...” as the redundant panel node is running on 4.0.2.
15. For the single panels and keypad (1.2, 1.3 and 1.4) power down the node and repeat steps 9 – 13.
- Expected downtime for panels with redundancy, approx. 10 minutes.
- Expected downtime for single panels and keypad, approx. 5 minutes.
16. When finished all panel nodes will be fully operable running on firmware 3.2.2.
17. Now to switch the panel firmware to 4.0.2 and upgrade the configuration to 4.0
18. Via RPS connect to all panels with the current 3.2 configuration. In our example RPS is connected to panel node 1.1. All nodes must display a yellow or green flag confirming connectivity!
19. Before you right-click on each individual node and “switch firmware”, ensure that your sequence does not isolate a node. Otherwise you need to go to that isolated node locally to switch the firmware. Send the “switch firmware” command to the panel you are physically connected to last.
In this example the firmware is switched first on node 1.3 and last on node 1.1


20. After the “switch firmware” command has been sent to each panel the panels will reboot, running on firmware 4.0.2 and default configuration.
21. Upgrade the 3.2 configuration to 4.0.

22. Afterwards open the 4.0 configuration and connect to all panels via RPS ensuring that all nodes must display a yellow or green flag confirming connectivity!
23. With “Configuration Overview” load the 4.0 configuration into all panels of the panel network.
24. After the panels reboot, reset all (network-related) faults. The panel network will be fully operational.
Expected downtime for panels depends on the number of nodes and configuration size. As a reference, the downtime for a panel network with 20 nodes (4 of which redundant) is approx. 20 minutes.
Note:
- Panels with redundancy will temporarily display “configuration mismatch …” until the main node has synced its configuration with the redundant node.
- All user passwords will be set to default and must be re-entered.
Still looking for something?
- Top Results