- Top Results
- Bosch Building Technologies
- Security and Safety Knowledge
- Fire
- How to use keypad programming to configure the FPD-7024 for phone communications
How to use keypad programming to configure the FPD-7024 for phone communications
- Subscribe to RSS Feed
- Bookmark
- Subscribe
- Printer Friendly Page
- Report Inappropriate Content
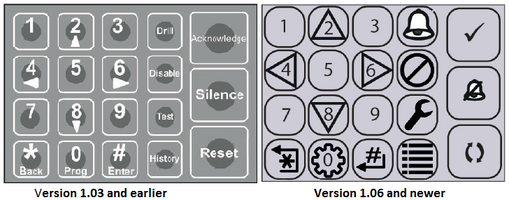
- Note that FPD-7024 ver1.06+ panel keypads use icons to identify functions rather than words. See figure 2 for interpreting icons to text.
- Press [ # ] to save entries or press star [ * ] to go back one level.
- Continue pressing star [ * ] to exit programing.
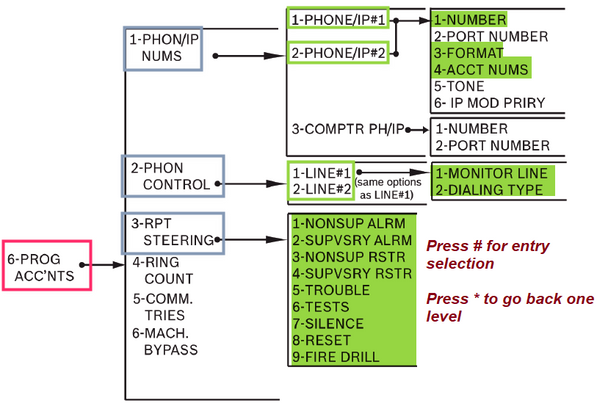
Figure 1 Menu prompts for phone communications
Figure 2 FPD-7024 Keypad Icons vs Text
Enter the receiver phone number, panel reporting format & account number.
-
Access keypad programming-Press 0 followed by the installer code (default= 9876).
-
See figure 1 for menu prompts.
-
- Press 6-Program Accounts.
- Press 1-PHONE/IP# 1.
- Press 1-Number.
- Enter the receiver phone number. The phone number entry in FPD-7024 panels always begin with 1.
- The initial 1 is an instruction for the panel to communicate by phone (versus network) and is not dialed. Include an additional 1 as part of the receiver phone number when it must be dialed.
- Follow the initial 1 with a ‘wait for dial tone’ which is entered by pressing [Test] + [4]. The current entry will display as: [ 1 > ] (see figure 3 for shortcuts to special character entries).
- Enter the receiver phone number. The phone number entry in FPD-7024 panels always begin with 1.
Figure 3 Shortcuts to special character entries
- Complete the receiver phone number entry. For example, the phone number 1-800-289-0096 will display as 1 > 1 8 0 0 2 8 9 0 0 9 6 ? ? ? ?. Press [#] to save.
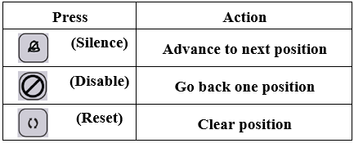
- The [?] is a terminate symbol used to end the dialing process, press
to enter the [ ? ] (or press Drill on ver 1.03 and earlier) . See figure 4 to assist with navigating keypad entries.
- The [?] is a terminate symbol used to end the dialing process, press
Figure 4 Keypad entry navigation keys
- Press 3-FORMAT. Select a reporting format and press # to save.
- 0- DISABLE
- 1- 3/1 REPORT
- 2- 4/2 REPORT
- 3- BFSK REPORT
- 4- SIA, 110 RPRT
- 5- CONTACT ID
- 6- SIA, 300 RPRT
- 7- MDM 3A2 (Modem)
- Press 4-ACCT NUMS.
- Version 1.03 and earlier: The account number entry is limited to only 4 digits, enter the 4 digit account number and press # to save.
- Version 1.06 and higher: The account number entry may range between 4-10 digits depending on the reporting format, see below for details. In most cases the account number is entered with six leading zero's such as; 0000001234. Enter the account number and press # to save.
- SIA: The SIA format supports low order six-digit account numbers. For SIA format, if 1-4 digits are entered the panel ignores the leading zeros and the panel will send 4 digits. If 5 or 6 digits are entered it will send this number of digits to the central station.
- Contact ID: The Contact ID format supports a ten‑digit account number. If 1-4 digits are entered the leading zeros are ignored and the panel will send 4 digits. When 5-10 digits are entered the panel will send 10 digits to the central station.
- Modem IIIa2: The format supports a 10‑digit account number. If 1-4 digits are enter the leading zeros are ignored and the panel will send 4 digits. When 5-10 digits are entered the panel will send 10 digits to the central station.
- Press [ * ] to return to PHON/IP NUMS.
- Press 2-PHONE/IP#2.
- Repeat the steps above to enter Number/Format/Account Number for Phone/IP#2.
- Press [ * ] to return to PROG ACC’NTS.
Configure phone line supervision and dialing type: Version 1.06+ panels only use phone lines which are supervised, follow the steps below to enable phone line supervision. This does not apply to version 1.03 and earlier versions.
- Press 2-PHON CONTROL.
- Press 1-LINE #1.
- Press 1-MONITOR LINE.
- Select Yes (1) to monitor the phone line. Press # to save.
- Press 2-DIALING TYPE.
- Select 3-TONE ONLY. Press # to save.
- Press [ * ] to return to PHON CONTROL.
- Press 1-MONITOR LINE.
- Press 2-LINE #2 and repeat the above steps for phone line #2.
- Press [ * ] [ * ] to return to PROG ACC’NTS.
- Press 1-LINE #1.
Configure Report Steering.
- Press 3-RPT STEERING. The display scrolls through each event type for reporting. Select how the panel the panel will report each event type from the list below and press # to save. The default setting is PH/IP 2 BKUP.
- 1- NONSUP ALRM
- 2- SUPVSY ALRM
- 3- NONSUP RSTR
- 4- SUPVSY RSTR
- 5- TROUBLE
- 6- TESTS
- 7- SILENCE
- 8- RESET
- 9- FIRE DRILL
- Select from the options for panel phone reporting for each event type.
- 1-PH/IP 1 ONLY: The report only sends to Phone/IP #1 using the primary physical path. Disable phone line 2 monitoring when PSTN used.
- 2-PH/IP 2 ONLY: The report only sends to Phone/IP #2 using the primary physical path. Disable phone line 1 monitoring when PSTN used.
- 3-PH/IP 1 & 2: The panel sends the report to Phone/IP #1 receiver using the primary physical path and also to Phone/IP #2 receiver using the primary physical path. If these reports fail the panel sends the reports to Phone/IP #1 receiver using the secondary physical path and also to Phone/IP #2 receiver using the secondary physical path.
- 4-PH/IP 2 BKUP: The report sends to Phone/IP #1 using the primary physical path. If the report fails the panel sends the report to Phone/IP #2 using the primary physical path. If this report also fails the panel will send the report to Phone/IP #1 receiver using the secondary physical path. If the report still fails the panel sends the report to Phone/IP #2 receiver using the secondary physical path.cz
- 5-NO REPORT: No report are sent. Press the number key that corresponds with your selection. The previous window appears.
- Select from the options for panel phone reporting for each event type.
Test phone communications:
Test phone communications by pressing [+] 2 for Communicator Test (ver 1.06+). Press Test [+] 2 with 1.03 and earlier types. Be sure that TESTS are configured in report steering in order for the communicator test to pass.
Still looking for something?
- Top Results


