- Top Results
- Bosch Building Technologies
- Security and Safety Knowledge
- Security: Video
- How to import video and storage devices from a DIVAR IP to BVMS while retaining all record...
How to import video and storage devices from a DIVAR IP to BVMS while retaining all recorded videos?
- Subscribe to RSS Feed
- Bookmark
- Subscribe
- Printer Friendly Page
- Report Inappropriate Content
The purpose of this article is to provide step by step instructions on how to successfully import video and storage devices from a DIVAR IP Recording Appliance to a BVMS standalone installation while retaining all existing recorded video.
Note: This procedure should only be performed by a certified BVMS / VRM technician or installer
Prior to starting
- BVMS and VRM, should be installed on all systems involved in the transfer.
- A backup of the BVMS Elements file and config.xml from all VRMs involved should be made before starting the procedure.
- BVMS Configuration Client should be accessible to the technician, or should be installed on the technician's laptop.
Note: Due to the usage of hardware IDs utilized by recording appliances, Bosch Configuration Manager can no longer be used in this scenario.
Scenario
This article will simulate transferring devices and storage associated with a DIVAR IP appliance to a VRM installed in a BVMS standalone installation:
This is a field scenario where multiple appliances have been installed, and over time the system has grown to a point that a professional BVMS installation is put in place. This scenario provides the ability to leverage existing storage on the appliances, as well as retention of existing video.
Step-by-step guide
A. Appliance system
There are several steps in preparing the system for migration, these should be performed in order.
1. Stop all recording on devices to be transferred:
- In BVMS Configuration Client navigate to the “Cameras and Recording" Tab
- Select the “VRM” menu.
- In the “Recording” submenu select “No Recording” for all devices assigned to the appliance.
- Save and Activate changes.
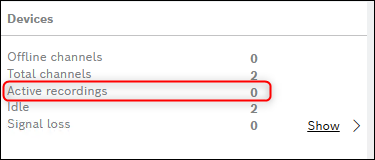
2. To verify recordings have been stopped, from the “Devices” menu in Configuration Client right click the appliances VRM and select “Show VRM Monitor”:
- From the devices menu on the VRM Monitor page the “Active recordings” should read 0.
3. Preventing cross communications from the old system to migrated devices is critical once in they are in new system. The suggested work flow is as follows:
- From the devices menu right click and “Remove” all video devices from the Appliance’s VRM.
- Remove the Appliance’s storage from the VRM.
- Save and Activate Changes.
- Remove the VRM from the BVMS system, Save and Activate changes.
4. From the “Services” menu on the Appliance the following services should be stopped and modified:
- Bosch Video Recording Manager (Primary and Secondary).
- BVMS Central Server.
Service “Startup type” should be modified to either “Manual” or Disabled”
B. BVMS standalone system
From the BVMS standalone system, the first step is to add the legacy storage. Prior to performing this step there are certain technical aspects that may impact the migration and need to be considered.
- Spans on the legacy storage have already been issued to the video devices that will be migrating into the new system.
- To avoid span distribution issues, such as assigning the same span to multiple devices, one of two steps can be performed.
- Add legacy devices and storage to a new “Storage Pool”.
- “Default” migrated video devices prior to finalizing the migration.
In this technical brief the new “Storage Pool” method will be utilized”.
To add a new “Storage Pool” right click the systems VRM:
- Select “Add Pool”.
- After adding the pool, right click and “Add iSCSI”.
- From the “Add iSCSI Device” menu enter the appropriate information. In this example we assigned the name “migrated” to the legacy storage
- Save and Activate changes.
⚠️ NOTE: If you are adding legacy storage to a common pool, DO NOT activate yet!
- From the new systems VRM Monitor page you should see that there are now “Legacy recordings”.
These are the existing recordings of the cameras to be migrated.
5. To migrate video devices, after legacy storage had been added right click the new pool and select the “Scan for Encoders” sub menu:
- From the “Scan Wizard” menu select all devices to be migrated.
- Once devices have been added, Save and Activate changes.
- Add devices to the Logical Tree and adjust “Profiles” and recording settings as needed”.
6. From the VRM Monitor page you should see the following:
- Legacy recording should be 0 bytes. These recording should be re associated with the newly migrated cameras.
- Total channels should reflect the new camera count of the system.
7. From BVMS Operator Client newly migrated devices, along with their legacy recordings, should be accessible.

You might need to restart the VRM services in order to see the correct information in VRM monitor and in Operator Client.

Still looking for something?
- Top Results


