- Top Results
- Bosch Building Technologies
- Security and Safety Knowledge
- Security: Video
- How can I connect an Intuikey keyboard to the Divar Network/ Hybrid 5000?
How can I connect an Intuikey keyboard to the Divar Network/ Hybrid 5000?
- Subscribe to RSS Feed
- Bookmark
- Subscribe
- Printer Friendly Page
- Report Inappropriate Content
Question
How can I connect an Intuikey keyboard to the Divar Network/ Hybrid 5000?
Answer
Use the keyboard connection on the back of the unit to connect a Bosch Intuikey keyboard using one of the following methods:
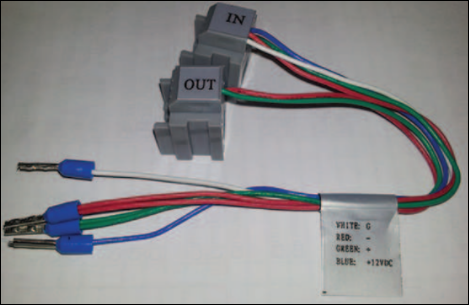
1. Connect using RJ11 adapter
Connect the adapter as follows:
- red cable to the (-) of the keyboard control connector
- green cable connects to the (+) of the keyboard control connector
- white cable to ground
- blue cable to +12V

RS-485 only on hybrid models.
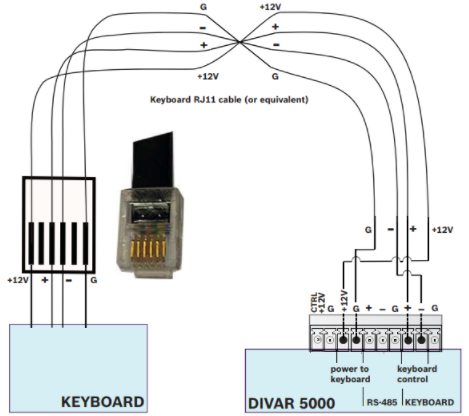
2. Connect wires directly: strip the keyboard cable (or equivalent cable) to connect leads directly
- Cut off one of the connectors at the end of the cable.
- Strip the cable wires.
- Attach the stripped wires to the keyboard connector on the back of the DVR according to the illustration below.
- Insert the attached cable connector into the DVR connector on the back of the keyboard.

For short distances (up to 30 m), standard 6-core telecom flat cable can be used to supply signal connections for the keyboard (LTC 8558/00).
Always use the Keyboard Extension Kit (LTC 8557) for distances over 30 m between the keyboard and the DVR; this kit provides junction boxes and cables.
Maximum cable length: 30 m (using standard 6-core telecom flat cable), or 1.5 km (using Belden 8760 or equivalent). The appropriate power supply (11 - 12.6 VDC, maximum 400 mA) to externally power the keyboard must be purchased separately.
RS485 port connection (only hybrid models)
Use the RS485 connector to connect Bosch, Pelco-P or Pelco-D controllable cameras to the unit for pan, tilt, and zoom control. RS485 is a single-direction protocol; the PTZ device can’t return any data to the unit.
Since RS485 is disabled by default for each camera, you must enable the PTZ settings as follows:
- Connect a suitable cable to the RS485 connection on the DVR rear panel.
- Connect the other end of the cable to the appropriate pins in the camera connector.
- Follow the instructions in the Operation section of this manual to configure the camera for PTZ control.
The Bosch protocol is supported with the following baud settings:
– 9600 baud
– 8 data bits
– 1 stop bit
– no parity
– no flow control
RS485 connector:

Max. signal voltage is -8 to +12 V. The recommended cable cross section is AWG 28-16 (0.08-1.5 mm2).
|
Signal name |
Pin number |
Description |
|
TX + |
1 |
Data transmission |
|
TX - |
2 |
Data transmission |
|
GND |
3 |
Shield |
RS232 port connections
The RS232 port can be used to connect different devices:
– Console
– PTZ Matrix - a pan and tilt control unit (using RS232 to Biphase converter)
The device type and required settings can be assigned in the menu (Settings > System > Serial Port).
Specifications:
- Connector type: 9-pole D-type male connector
- Maximum input voltage: ±25 V
- Communication protocol: Output signals according EIA/TIA-232-F
RS232 serial port:

|
Signal name |
Pin number |
Description |
|
DCD_in |
1 |
Carrier detection signal (not used) |
|
RX |
2 |
RS232 receive signal |
|
TX |
3 |
RS232 transmit signal |
|
N/ C |
4 |
No connection |
|
System ground |
5 |
System ground |
|
N/ C |
6 |
No connection |
|
RTS |
7 |
RS232 request to send signal |
|
CTS |
8 |
RS232 clear to send signal |
|
N/ C |
9 |
No connection |
Additional questions:
Q: Is Divar Network 5000 compatible with KBD-Digital Intuikey?
A: Divar Network 5000 was tested to work with KBD-Digital Intuikey to control the camera directly from the DVR.
Both products must be at the latest version: https://downloadstore.boschsecurity.com/index.php
On the link above, select the Firmware tab and you will find the available firmware versions for DIVARs.
Q: Which is the Baud rate that should be set when using Bosch keyboard (Intuikey series)?
A: Use the Serial port menu to configure the connections for a Console connected to the RS232 port, and an optional Bosch keyboard (Intuikey series) connected to the extra RS485 port (on DIVAR 5000 models). Configure the settings for Console or Bosch keyboard as described below.
RS232 serial port
- Baud rate: from 1200 to 115200 (default)
- Data bit: from 5 to 8 (default)
- Stop bit: 1 (default) or 2
- Parity: none/odd/even/space/mark (default is none)
- Note: If the console connection to the RS232 port is not working, the RS232 port may already be selected for PTZ control – this is done in the Camera > Configuration > PTZ screen. If so, go first to this screen and reset the Com connection field to RS485.
Bosch keyboard
- Baud rate: from 1200 to 115200 (default is 19200)
- Data bit: from 5 to 8 (default)
- Stop bit: 1/2 (default is 1)
- Parity: none/odd/even/space/mark (default is none)
- Keyboard address: (default is 1) One Intuikey keyboard can communicate with a maximum 16 DIVARs. If assigning multiple DIVARs to a keyboard, Set the Keyboard address for every DIVAR.
- First camera offset: (default is 1) Set this offset for every DIVAR. Camera 1 of the DIVAR will be called on the keyboard by selecting the programmed ‘First camera offset’ number. For example, set the offset to 101 so when you select 101, camera 1 is displayed in full screen on monitor A of that selected DIVAR. Press 112 to display camera 12 in full screen.
Press <Save> to enter changes and go back to the previous menu.
Still looking for something?
- Top Results