- Top Results
- Bosch Building Technologies
- Security and Safety Knowledge
- Security: Video
- Alarm Management Configuration: How to connect AVIOTEC
Alarm Management Configuration: How to connect AVIOTEC
- Subscribe to RSS Feed
- Bookmark
- Subscribe
- Printer Friendly Page
- Report Inappropriate Content
AVIOTEC camera is a video-based fire detector with the capability of detecting both fire and smoke in the scene, it is also fully capable of running standard IVA rules in the camera.
When smoke or fire is been detected, AVIOTEC will sent a Smoke/Fire event to the Alarm Management and at the same time trigger it’s output. Using this output status, we are able to trigger Alarm Management .
Please make sure that these pre-conditions are met:
You have access to a Alarm Management instance
The AVIOTEC camera that you want to configure is connected to the Alarm Management via Remote Portal
You have activated the appropriate Alarm Management license in Remote Portal for the respective AVIOTEC camera
You are running the latest firmware for the AVIOTEC. This example was tested with: 7.82.0025.
Step-by-step guide
Limitation:
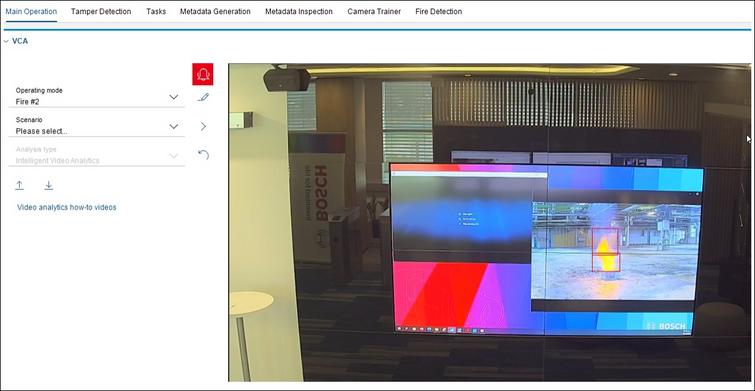
- There are 3 Fire profile in AVIOTEC, the default been “Fire”, this profile will not allow configuration of IVA rules in the camera. The other 2 profiles are called “Fire #1” and “Fire #2” these are profiles that works with both Fire/Smoke detection and IVA rules. Please just use “Fire #2” profile that works with both Fire/Smoke detector and with IVA detections for Alarm Management.
- The output (relay) of the AVIOTEC will turn on when either Smoke or Fire has been detected, it will remain on if the Smoke or Fire still visible, hence, Alarm Management will only be triggered once in such case. The output (relay) will reset to off when there are no Smoke or Fire visible in the scene.
- Regardless of how many fire spots have been detected, the output (relay) on the AVIOTEC will not retrigger when a new fire spot or smoke spot is been detected, it will remains on as long as there is one fire or smoke spot in the scene.
Below are the steps to configure both the camera and the Alarm Management for Fire/Smoke Detection.
For details on how to setup the AVIOTEC camera for Fire/Smoke detection, please refer to the manual for details. In the following example, we will be using “Fire #2” profile, the steps for “Fire” profile is the same, except that “Fire” profile does not allows configuration of IVA rules.
Step 1:
Goes to VCA->Main Operation.
Select “Fire #2” profile

Step 2:
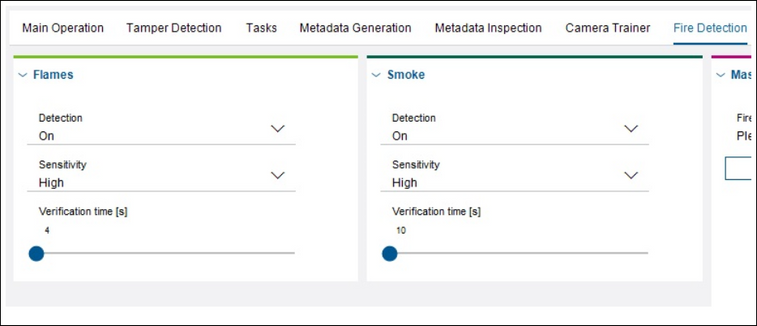
Go to Fire Detection
Configure the Fire detection parameters as required.

Step 3:
Login to the Alarm Management instance.
Navigate to the relevant site and add the device to the Alarm Management (if not already done: https://community.boschsecurity.com/t5/Security-Video/How-to-add-Remote-Portal-cameras-to-Bosch-Clou...)
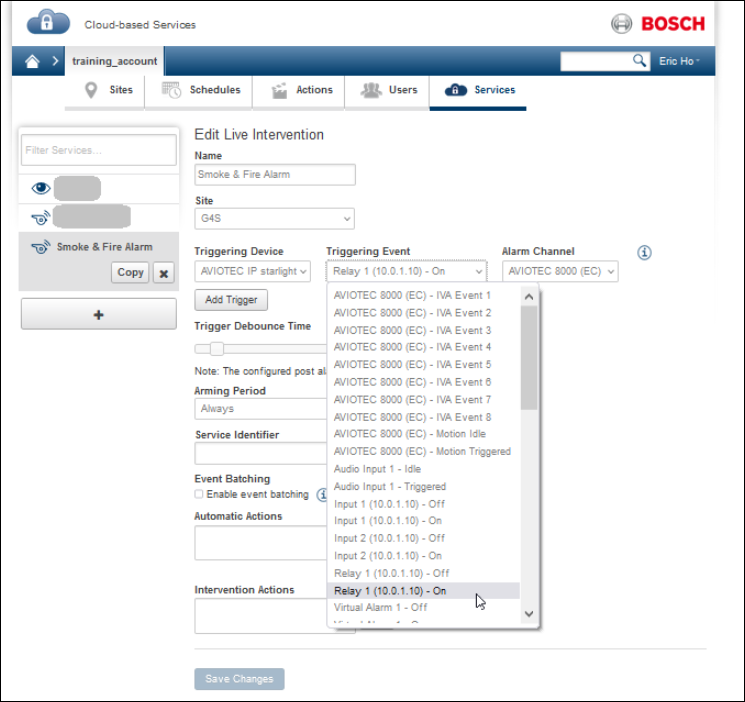
Create a new Alarm Management Service using Live Intervention.

Step 4:
Select the Trigger Device as the AVIOTEC camera, the Triggering Event as "Relay 1 ON" of the camera.
Select Always as the Arming Period.
Provide a self-explanatory Name for the service.
If there is a need to automatic or intervention actions, you will also need to configure it accordingly. Just an idea, you can create a pre-recorded voice message, such as “Fire or Smoke detected, please exit the building in an orderly manner” and use this as an audio announcement that could be triggered by the operator via the EVENTMONITOR web GUI.
The audio file is loaded to the Alarm Management and the action will play this audio file to any cameras in the site that has a speaker connected. This can be done using the Intervention action.

Still looking for something?
- Top Results