- Top Results
- Bosch Building Technologies
- Security and Safety Knowledge
- Security: Video
- Alarm Management Configuration: How to set up a Live View service?
Alarm Management Configuration: How to set up a Live View service?
- Subscribe to RSS Feed
- Bookmark
- Subscribe
- Printer Friendly Page
- Report Inappropriate Content
Live View Service

Verify your customer’s site on-demand.
Keep an eye on your customers’ sites, and verify on-demand if the site is clear before the personnel enters.
When immediate action is necessary, loudspeaker audio intervention enables operators to prevent damage.
Please follow below steps to set up a Live View service.
1. Configure the Live View Service as Integrator or Config Agent:
To configure the Live View service perform the following steps:
1.1 Add the camera to a Site
1. Open Alarm Management Configuration website (/config), log on as Integrator or Config Agent.
2. Enter the related Account - or create a new Account for the customer.
3. Enter the related Site - or create a new Site.

4. Click '+' button to add the camera to this Site.
5. Please follow the related document in the Configuration Notes to add a camera to Alarm Management:
a. Add Remote Portal cameras to Bosch Alarm Management
6. Rename the device (camera) and click 'Save Changes'.
7. Click tab 'Channels' and optional set a Reference Image.

8. Rename the channel.
9. Optional select the device on which the microphone and loudspeaker are connected to (Associated Audio Device).

(Note: An audio device different form ‘Same Device’ is currently not supported for 3rd party cameras.)
10. Optional configure Audio Options for the Operator Interface (Investigation Mode):
a. 'Activate Audio Verification' allows the operator to listen to audio from the site.
b. 'Activate Audio Intervention' allows the operator to speak through the loudspeaker into the site.

11. Optional configure Video Options for the Operator Interface (Investigation Mode).

12. Click 'Save Changes'.
1.2 Configure the Service Scenario
1. Open Alarm Management Configuration website (/config), log in as Integrator or Config Agent.
2. Enter the related Account.
3. Click tab 'Services'.
4. Click '+' button to add a Service.
5. Select Service Type 'Live View' and give the Service a descriptive name (mission).

6. Select the Site
7. Optional allow the operator to arm/disarm the site.

8. Click 'Create'.

9. Optional copy the created Live View’s permalink and paste it into the Monitoring Center’s alarm management software.
2. Verify the Live View service as Alarm Agent
To verify the Live Intervention service perform the following steps:
1. Open Alarm Management Event list website (/eventmonitor), log in as Alarm Agent.
2. Click tab 'Live Views'.
3. Click the related Live View service, the Operator Interface opens.

4. Verify the service:
a. Live video
b. Test Audio Verification (listen to site) and Audio Intervention (click microphone button to speak to the site).
c. Optional snooze the services related to this site and trouble processing.
d. Optional arm/disarm the Site.

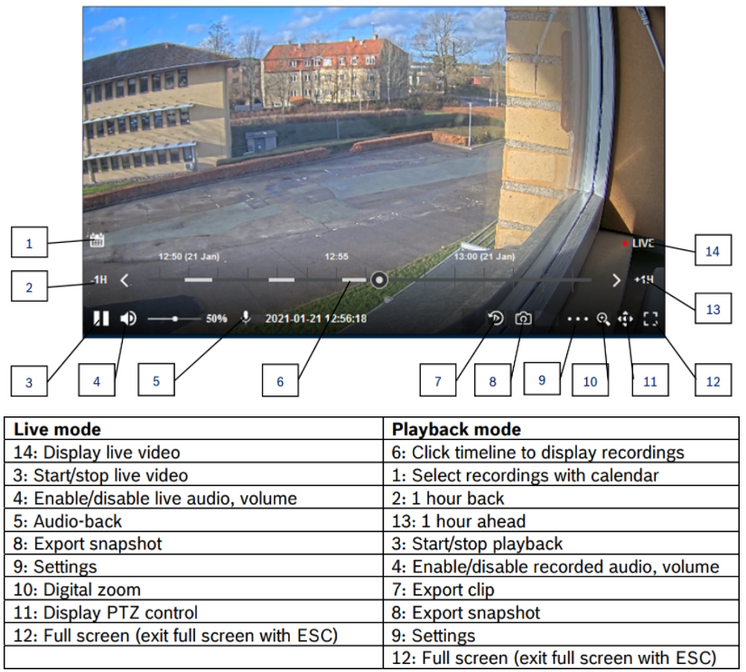
5. For 3rd party cameras, the HTML5 Video Control provides the following functionality for live video and playback in the Live View service:

Live mode details:
4: Enable Audio Verification from the camera and control the volume.

5: Enable and confirm audio-back to perform Audio Intervention.
Audio Intervention disabled:
Audio Intervention enabled: 
> allow audio-back:

9: Settings:

- Preferred format:
- WebRTC: low delay (UDP)
- for audio and PTZ control
- might be not available in corporate network - HLS: bit-rate adaptive streaming (TCP)
- no audio, no PTZ control - JPEG: JPEG polling
- WebRTC: low delay (UDP)

- Dewarping
- Off
- On (e.g. for fisheye camera)
11: Display in-window PTZ control

Playback mode details:
1: Calendar:
- Days with recordings are displayed in a circle
- Click to select the date

4: Enable audio playback from the recordings and control the volume.


9: Settings:
- Speed:
- Replay speed

Still looking for something?
- Top Results
