- Top Results
- Bosch Building Technologies
- Security and Safety Knowledge
- Security: Video
- How to assign IP address to a DIVAR IP 7000/ 6000 through haneWIN DHCP server software?
How to assign IP address to a DIVAR IP 7000/ 6000 through haneWIN DHCP server software?
- Subscribe to RSS Feed
- Bookmark
- Subscribe
- Printer Friendly Page
- Report Inappropriate Content
The haneWIN DHCP server software implements a DHCP and BOOTP server based on RFC 2131. The DHCP Server is implemented as a native service for background operation, A Control Panel applet provides interactive access to the service.
The server supports automatic DNS updates for DHCP configured clients.
The latest version is available and can be downloaded from here.
According to the Installation Manual of the DIVAR IP 7000/ 6000:
All DIVAR IP systems are preconfigured with default network, user and iSCSI settings.
By default, the virtual network adapter (the two physical NIC ports are teamed by default) is configured to obtain a valid network address from a DHCP server in the local network. If there is no DHCP server in the network, the system will use the following network settings:
– IP address: 192.168.0.200
– Subnet mask: 255.255.255.0
The haneWIN DHCP server software supports multiple address pools for dynamic IP address assignment as well as fixed IP address assignment to clients. IP address and parameter assignment can be based on:
- hardware address
- hardware address range (e.g. vendor bytes of MAC address)
- Server interface
- Client identifier
- Vendor or User class (as specified in RFC 3004)
- Relay IP address
- Relay Agent Information (as specified in RFC 3046) with support of trusted interfaces for transparent relay agents
Requirements:
Computer with Windows XP or higher.
Info: Please note that the haneWIN DHCP server software is shareware. You can use it free of charge for 30 days, after this period you need to pay if you want to continue using it.
|
Changing the IP address of a configured DIVAR IP video recorder can have significant implications for its network connectivity, security and remote access. Therefore, it is important to ensure that the change is done properly and in accordance with the Central Technical Support instructions. |
Step-by-step guide
1.Install haneWIN DHCP Server software on your PC
❗ Only Administrators are allowed to start the tool.
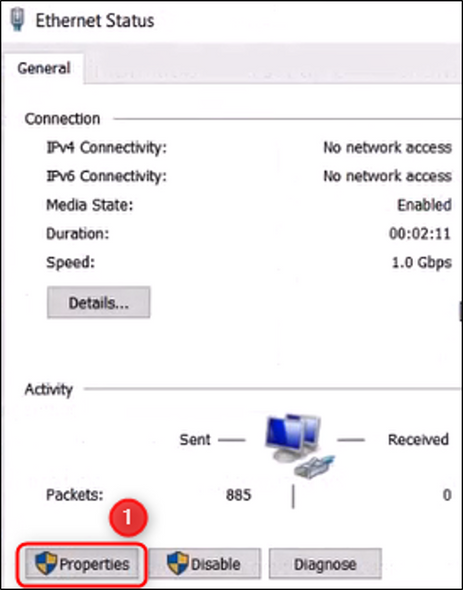
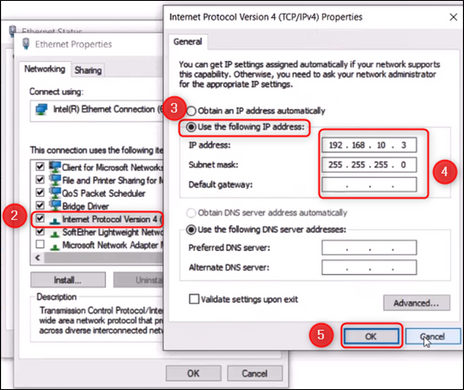
2. After the installation is complete, please go to the Network and Sharing Center and set the Network Card to a static IP Address
Ethernet > Properties > Internet Protocol Version 4 (TCP/IPv4) > select “Use the following IP address” option and fill in the IP address and subnet mask:
3. Open haneWIN DHCP Server tool and go to Options > select the profile displayed (in this case “If-2_241.1”)
a. Select the static IP address you set earlier, near the Interface IP Adress section
b. Fill in the range for the Dynamic IP address Pool
c. Fill in the static IP address you set earlier in the Gateway Address field
d. Fill in the subnet mask
e. Click OK
4. Disable Windows Defender Firewall
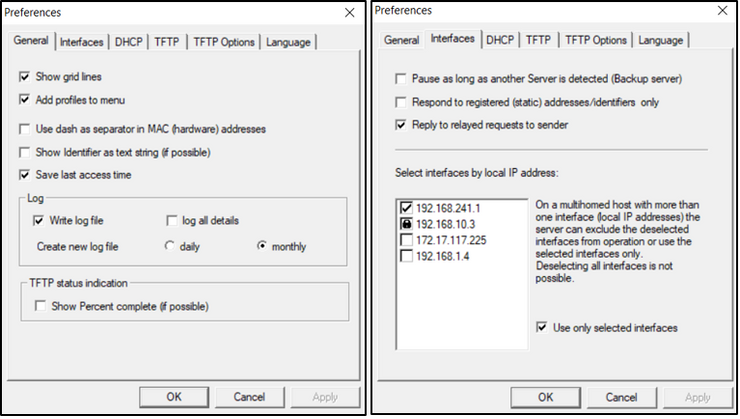
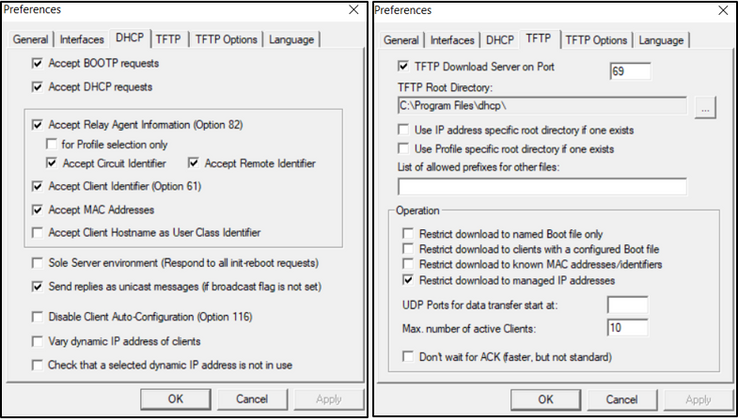
5. Please check if the settings from Options> Preferences are the same as below:


6. Please make sure that a LAN cable is connected between the DIVAR unit and the PC where the haneWIN DHCP Server software is installed
7. Go to “Dynamic” tab and wait until the IP address of the DIVAR will be displayed. The time required for this can vary and it may take a while.
The "dynamic" list shows all client addresses or identifiers that were assigned an IP address from one of the IP address pools of the server. The window shows the time the IP address lease ends and optionally the name accepted from a client and forwarded to a DNS server.
Good to know
If nothing is displayed in the “Dynamic” tab, try the following:
- close the haneWIN DHCP Server software tool
- remove the cable from the DIVAR
- open again the haneWIN DHCP Server software tool
- plug in the cable back into the DIVAR
- wait until the IP address will be displayed
Still looking for something?
- Top Results


