- Top Results
- Bosch Building Technologies
- Security and Safety Knowledge
- Security: Video
- Who rated this article
Who rated this article
How to create iSCSI Virtual Disk/LUNs after replacing an HDD on a DIVAR IP 5000 AIO?
This article describes all the steps that will help you to create iSCSI Virtual Disk/LUNs after replacing an HDD on a DIVAR IP 5000 AIO.
Article requirements:
- Disk Management
- BVMS Configuration Client which is included with BVMS
- Server Manager
- DIVAR IP 5000 AIO
Step-by-step guide
Add New Simple Volume:
1. Search for "Disk Management" and open it
The new HDD will be displayed as "Unallocated"
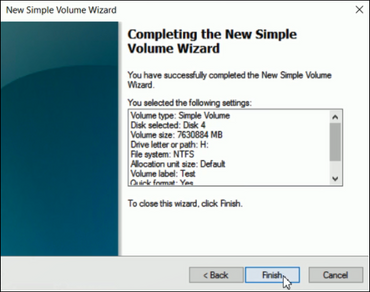
2. Right click on the new HDD (in this example Disk 4) and select "New Simple Volume" > Next > Next > Next > Next > Finish
3. The new volume will become "Healthy (Primary Partition)" and it will be displayed in Disk Management (in this example "Test (H:)") and in This PC folder (Test (H:) folder will be empty)
Create LUNs
1. If you check in Configuration Manager, under "Basic Configuration" menu, you will see the number of LUNs already configured (from the other HDDs - in this example 12 LUNs):
2. Open Server Manager
Important!
Go to "File and Storage Services".
Please check first in iSCSI menu if the Virtual Disk Status of the new path created before is "Error" instead of "Connected". If so, please right click on all of them and remove them from iSCSI Virtual Disks window.
In this example "H:\VHDxx.vhdx"
a) Go to Volumes menu > select H: > right click on it the and select "New iSCSI Virtual Disk"
b) Now, select the storage location (in this example H:) > click Next
**You can also select a custom path if you want.
c) Type in the iSCSI virtual disk name > click Next
d) Please always select "Fixed size" and add the size of the iSCSI virtual disk.
To calculate the number of LUNs for the detected capacity you need to follow the below procedure:
- If the size is calculated in TB, the capacity will be divided with :1.82 in TB
- If the size is calculated in Gb, the capacity will be divided with :1900 in Gb
You need to divide the physical capacity which is detected by the Configuration client as in the below picture with a number which is near the maximum size of 2000 Gb
For example in Gb: 19557/ 1900 = 10.29 => Number of LUNs = 11
As the result is above 10 we will select 11 in order for the luns to have a size near 2000Gb.
In this example, the free space is 7.28 TB:
7.28 TB/ 1.82 TB = 4 =>Number of LUNs = 4
e) Once you filled in the Size > click Next
f) Select "Existing iSCSI target (TG0)" > click Next and Create:
g) The iSCSI virtual disk will be created > click Close:
Because in this example we have 7.28 TB(Free space)/ 1.82 TB = 4 =>Number of LUNs = 4 => We added 4 New iSCSI Virtual Disks for H: volume
Therefore, steps a); b); c); d)....g) should be done 4 times.
The Initialization process could take quite a long time. This time depends on the physical capacity of the HDD.
Once the paths are initialized, they should display their status column empty and Virtual Disk status as "Connected".
Note: In case the status shows "Error", please restart the iSCSI service or restart the unit.
3. Now go to Configuration Client and right click on the DIP 500 AIO > select Scan Target and check if the LUNs are formatted.
Note: If they are "unknown" > tick all the boxes next to the LUNs > c) Hit Format LUN button > OK
Recommended select 4 LUNs at the time
Important:
If some of the LUNs were not formatted, tick all the remaining boxes with status “unknown” or “HD_FORMAT….” and hit again the Format LUN button
Wait until all the LUNs are formatted and click the Activate Configuration button > OK
Still looking for something?
- Top Results


