- Top Results
- Bosch Building Technologies
- Security and Safety Knowledge
- Security: Video
- How can you avoid the MIC Inteox, Ultra & Starlight 7100i camera wipers getting stuck?
How can you avoid the MIC Inteox, Ultra & Starlight 7100i camera wipers getting stuck?
- Subscribe to RSS Feed
- Bookmark
- Subscribe
- Printer Friendly Page
- Report Inappropriate Content
Question
How can you avoid the MIC Inteox & Starlight 7100i camera wipers getting stuck?
Answer
The root cause of the malfunctioning of wiper is the corrosion of the components where the wiper is connected to the camera (items below)

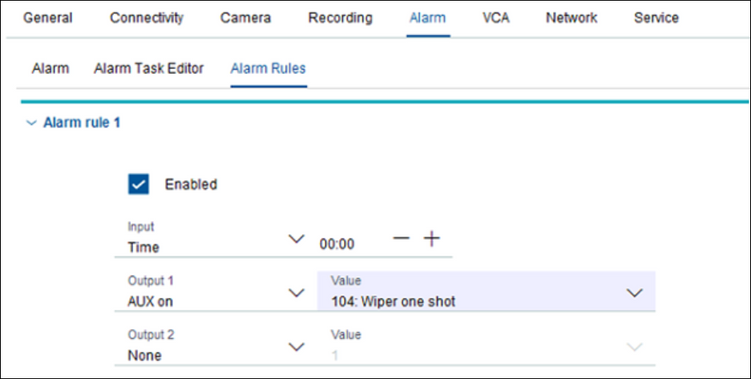
It is advised to activate the wiper daily on all current installed cameras, to prevent the wipers get stuck. This can be easily programmed via the Alarm rules as this is a default functionality of the camera.

For cameras that the wiper has not failed, the wiper should be moved 1x / day so that the wiper shaft is moved regularly.
Please set the wiper to move automatically at a time that is convenient for you.
Replacing a wiper assembly:
1. Put a piece of thin, protective material between the window glass and the wiper to prevent accidental damage.

2. With one hand, hold the wiper arm firmly in place to restrict rotational movement.
3. With the other hand, using a 7mm Hex socket or nut driver, rotate the acorn nut counterclockwise until fully unthreaded from the wiper shaft.

4. Remove the wiper spring, hub, arm, and blade assembly from the wiper shaft.

5. Take the new wiper arm and assemble to the new wiper hub.

6. Take the new blade assembly and insert into the new wiper arm.

7. Slide the new wiper hub and attached parts onto the wiper shaft.

8. Slide the new wiper spring onto the wiper shaft and over the new wiper arm.

9. Apply Loctite 243 to the acorn nut cavity. Lightly thread the new acorn nut onto the wiper shaft over the new wiper spring and new wiper hub.

10. With one hand, hold the new wiper arm firmly in place to restrict rotational movement and to keep the wiper assembly parallel with the flat top of the glass.
11. With the other hand, using a 7mm Hex socket or nut driver, tighten the new acorn nut-- rotate clockwise—to a torque value of 1.0 Nm.

Still looking for something?
- Top Results