- Top Results
- Bosch Building Technologies
- Security and Safety Knowledge
- Security: Video
- How to export VRM recordings of cameras & convert them to mp4-file (VRM eXport Wizard 2.10...
How to export VRM recordings of cameras & convert them to mp4-file (VRM eXport Wizard 2.10)?
- Subscribe to RSS Feed
- Bookmark
- Subscribe
- Printer Friendly Page
- Report Inappropriate Content
Similar to VRM eXport Wizard 2.0, encrypted and unencrypted VRM recordings can be exported (VRM block export) from any video surveillance system based on Bosch Video Recording Manager (VRM) and exported recordings can be converted to mp4-files.
VRM eXport Wizard 2.10 introduces a new look and feel of the graphical user interface and some UX changes. In general, the VRM eXport wizard is a software tool that allows you to export video directly from the VRM and to convert exported video data to mp4. You can find the VRM eXport wizard setup file in the VRM Master Installer or in the bonus directory of the BVMS zip file.
Exports made with the VRM eXport Wizard 2.10 can be open in BVMS (Viewer) 9.0 or newer. In this document we describe how to use the VRM eXport Wizard for either export of video data and conversion of the exorted video data to mp4.
With the VRM eXport Wizard 2.10 encrypted and unencrypted VRM recordings can be exported (VRM block export) from any video surveillance system based on Bosch Video Recording Manager (VRM) and exported recordings can be converted to mp4-files.
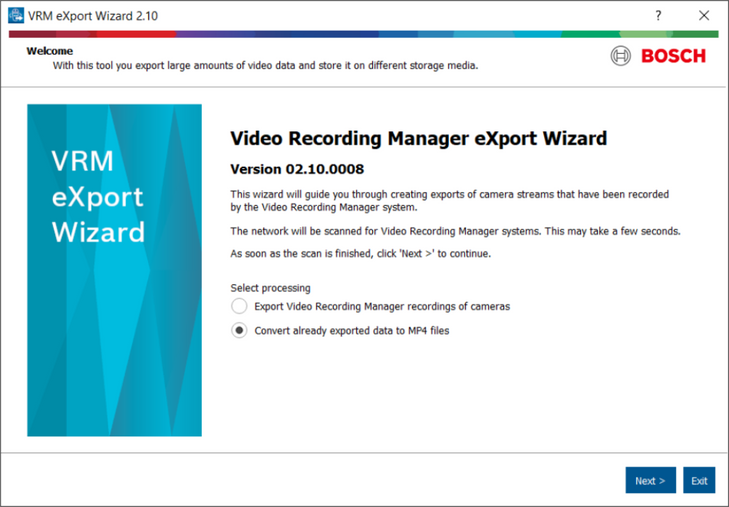
Therefore, the VRM eXport Wizard 2.10 offers - similiar to the previous version - the following two options, compare also Figure 1:
- Export Video Recording Manger recordings of cameras
- Convert already exported data to MP4 files
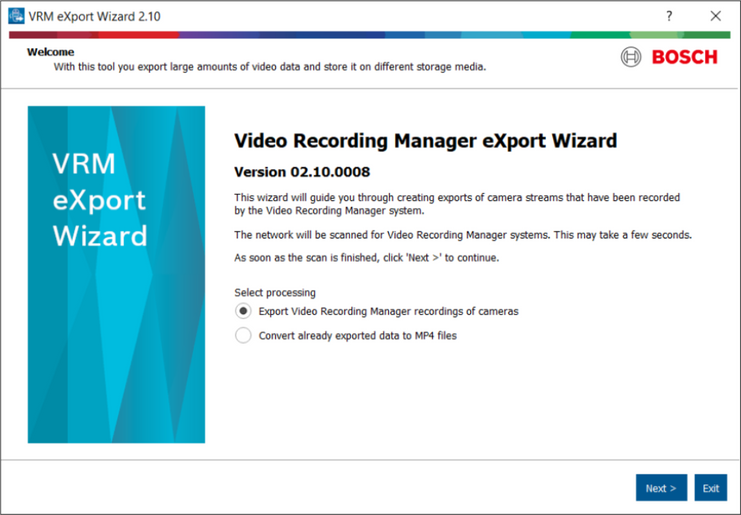
Figure 1
Step-by-step guide
1. Mass-export for evidence retrieval
When using the VRM eXport wizard for export, the VRM eXport wizard does not convert (transcode) the video but copies it in it's original format to the specified storage location. This makes the VRM eXport wizard very suitable for mass-exports in case of, for example, incidents in which the authorities require a copy of large volumes of video.
The storage hardware performance (source and destination) determines the actual speed of the export process and the VRM eXport wizard allows to limit the export speed to prevent recording gaps for cameras that actively record on the storage device.
2. Mass-export for remote IVA fine-tuning
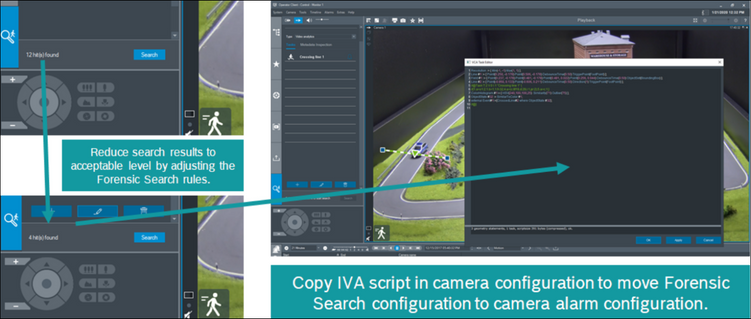
Exports made with the VRM eXport wizard include IVA metadata. You can use Forensic Search on the exported video (including metadata) to come to an acceptable number of search results covering a specific time frame (for example, one day).
You can open the corresponding IVA script using the context menu (right click) in the image pane. Copy the script into the IVA configuration of the camera, and the camera applies the Forensic Search parameters to its alarm configuration. The image below visualizes this process.
3. Mass-export for troubleshooting
As the VRM eXport wizards exports the recorded video without changing its format, it is also the ideal tool to troubleshoot potential errors in the recorded video. The technical support teams might ask you to use the VRM eXport wizard to export video information so they can investigate the root cause of certain issues.
Please make sure you select the right camera and time frame related to the issue you experience.
Export VRM recordings
To export recordings, no matter if encrypted or un-encrypted recordings, from a video surveillance system based on VRM, the user first needs to select and connect to the Bosch VRM system that contains the source video data the user wants to export.
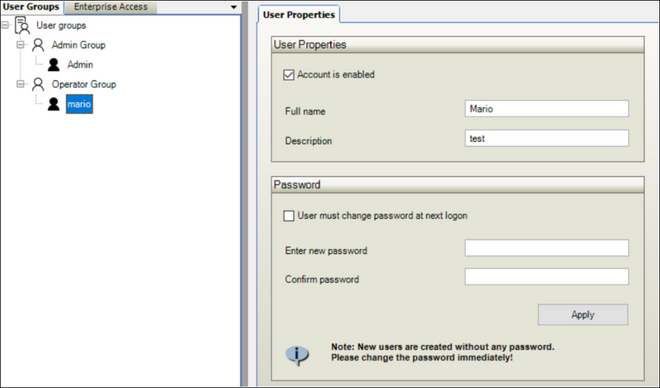
You need to login to the VRM with the right user permissions. When using BVMS, we recommend to use an existing BVMS user account for this.
To optimize the data traffic, the user can further select the number of maximum sources exported in parallel and set the maximum bit rate used per source, see Figure 2.
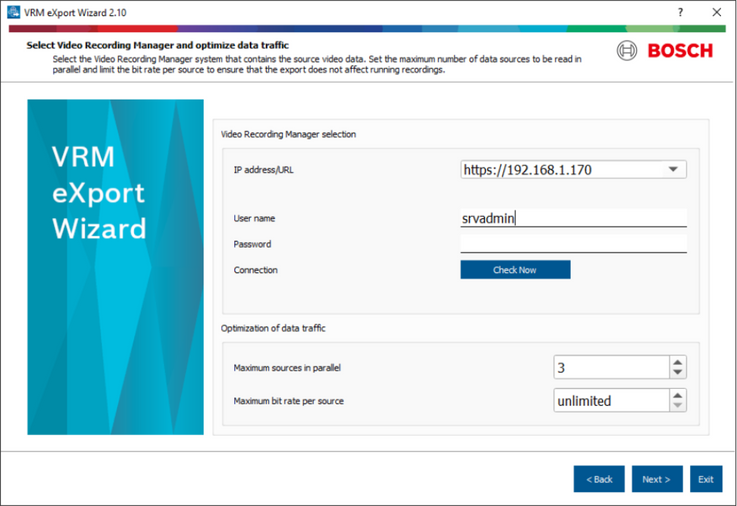
Figure 2
The maximum bit rate per source is depending on the storage hardware performance. Bosch storage devices (DIVAR IP, DSA E-series) are tested with 20% read speed, compared to their specified recording speed. For the DIVAR IP 7000 R2 this means, for example, 20% of 475 Mbit/s = 95 Mbit/s. We generally recommend to use 50% of the read performance of the device for export purposes.
For the DIVAR IP 7000 R2 this means you should configure the VRM eXport wizard to ~50 Mbit/s. Increasing the read speed might cause recording gaps or result in strange behavior when operators try to replay video footage. This still allows your video surveillance operators to replay video footage from the device and allows cameras to continue to record on the device.
The table below shows an example calculation of export times considering certain replay speeds.

Considering the example presented in the table above, you are exporting video at 23x the recording speed when exporting at 50 Mbit/s or 51x the recording speed at 100 Mbit/s.
Note: To avoid any performance loss of the VRM system it is not recommended to run the VRM eXport Wizard on the same hardware as the VRM itself or any other system critical server (e. g. VRM server, BVMS MS, etc.).
In the next step (Figure 3) the user selects the cameras and the time period that shall be included in the export. Additionally, the user can change the name of the export file and add a comment.
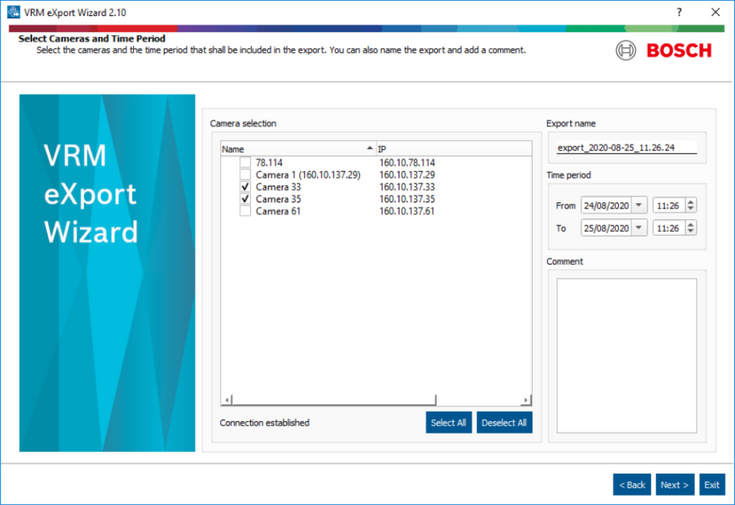
Figure 3
Once the user is done with the camera selection, the export destination has to be selected in the "Select Type and Destination" window, see Figure 4. Here the user can choose between CIFS export, iSCSI export and export to a file system.
Note: The tape export some users might know from previous older versions is no longer supported since VRM eXport Wizard 2.00.
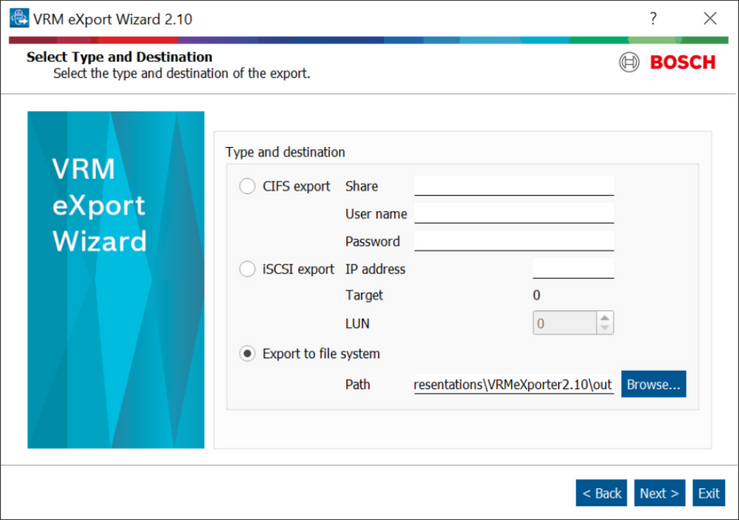
Figure 4
Once the destination is selected, the export process can be started. The VRM export Wizard informs about the current status of the export process and tells the user when the export is completed, compare Figure 5.
The exported blocks can now be found on the before chosen destination platform.
Please note for mass exports, if the overall export time is longer than the respective retention time for a camera not all video data might be exported before being overwritten / deleted.
As already mentioned above, this export procedure works for unencrypted as well as encrypted VRM recordings (encrypted and unencrypted VRM blocks).
Unfortunately, for playback of the exported material we have to differentiate between encrypted and unencrypted exported recordings. For playback of unencrypted video data exported by the VRM eXport Wizard BVMS is the best choice, as the user can then also take advantage of the meta data like IVA information.
For now, this is not possible for encrypted recordings, because the re-import of encrypted VRM block exports is not yet supported. Instead, the user has to take advantage of the new mp4 conversion functionality of the VRM eXport Wizard. Of course, the conversion also works for unencrypted recordings.
Both cases are explained in this document as well.
Determine the mapping of raw video data to a camera
The export of VRM recordings results in a data folder keeping the exported raw video data. In the uppermost folder of an export there's a file named "info" without filename extension.
- The info file is openable via text editor and gives a hint where the raw video data of each camera is stored.
- The info file shows in the first 4 lines general information about the export.
The following lines show the allocation of the numbered folders to the exported raw video data of each camera. Each allocation starts with a number in square brackets indicating the name of the folder, where the raw video data is stored. The next two lines refer to the name and IP address of the camera the raw video data was generated. The last two lines of the allocation block "line" and "instance" are neglible information.
The next number in square brackets indicates another allocation.
So for example if you have two folders 4 and 7 in your selected export folder, you can simply check the content of the info file to find out the camera name and its IP address, see Figures 5 and 6.

Figure 5
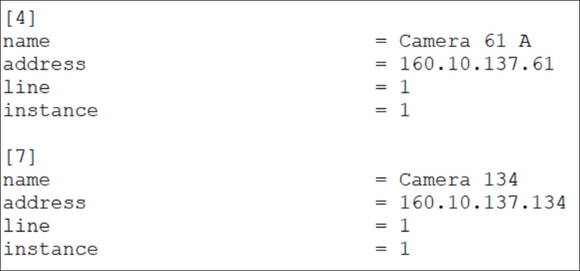
Figure 6
Convert already exported data to mp4
To convert VRM block exports to mp4 format the user has to choose the option "Convert already exported data to mp4-file", see Figure 6.
Limitations:
- Max file size per MP4 file is 500 MiB
Figure 7
How to convert unencrypted recordings to mp4?
In the "Select exported data for conversion" screen the user can choose the source, in this case unencrypted recording blocks, and the output directory, where the mp4 files shall be saved to, Figure 7.
To choose the exported VRM blocks, which shall be converted to mp4 format, the user has to navigate to the corresponding camera folder and has to select the related BIN.file. This is illustrated in Figure 8.
For unencrypted VRM blocks no further information is needed and conversion can be started by pressing the next button in the "Select exported data for conversion" screen.
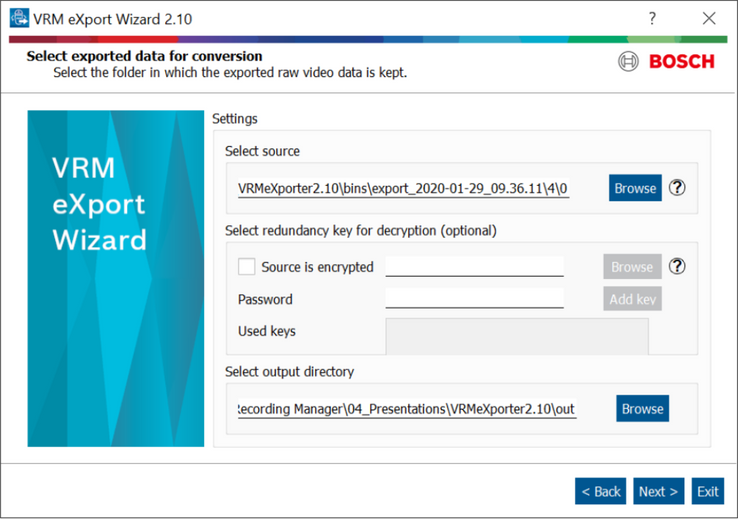
Figure 8
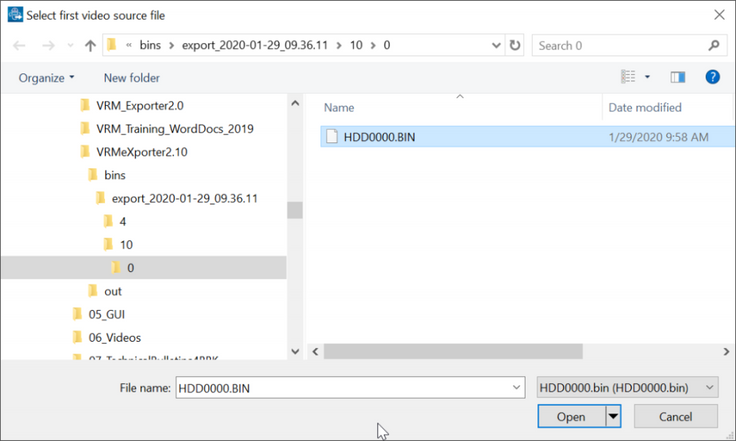
Figure 9
Similar to the export procedure the VRM eXport Wizard also shows the status of the conversion process.
Once it is successfully finished, the screen will look like in Figure 10.
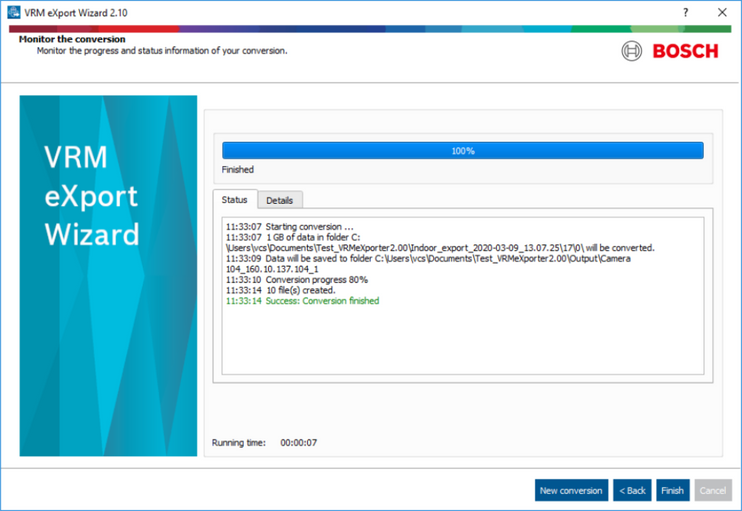
Figure 10
How to convert encrypted recordings to mp4?
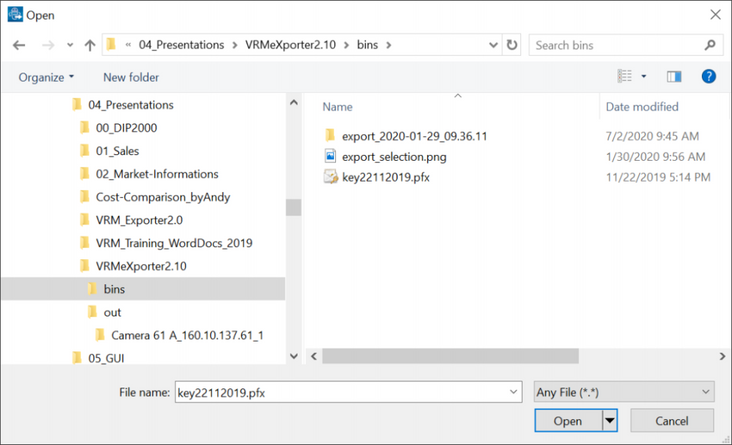
The conversion of encrypted VRM blocks starts in the same way as the "unencrypted recordings" case above. However, in the "Select exported data for conversion" screen the user needs to add a valid redundancy key for encryption. Therefore, the checkbox "Source is encrypted" needs to be checked and the redundancy key (a .pfx file) needs to be selected and the password needs to be entered, as demonstrated in Figure 10 and Figure 11.
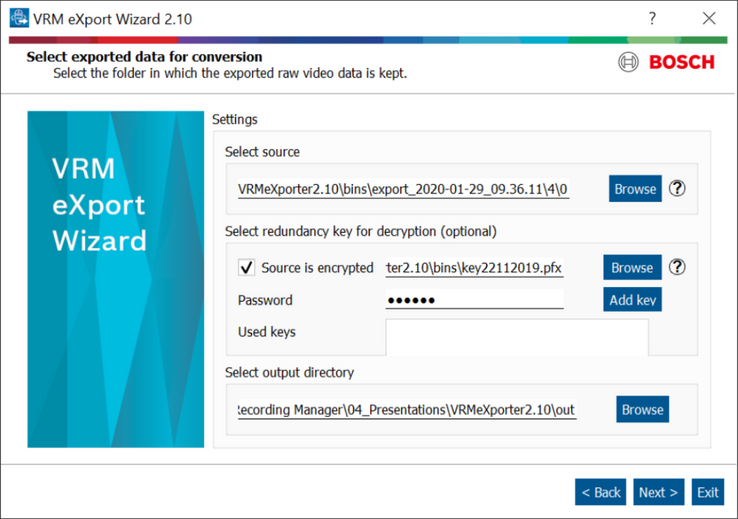
Figure 11
Figure 12
Still looking for something?
- Top Results
