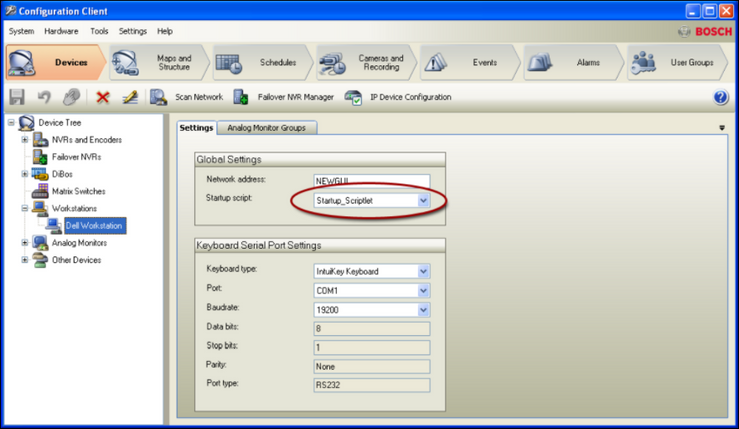
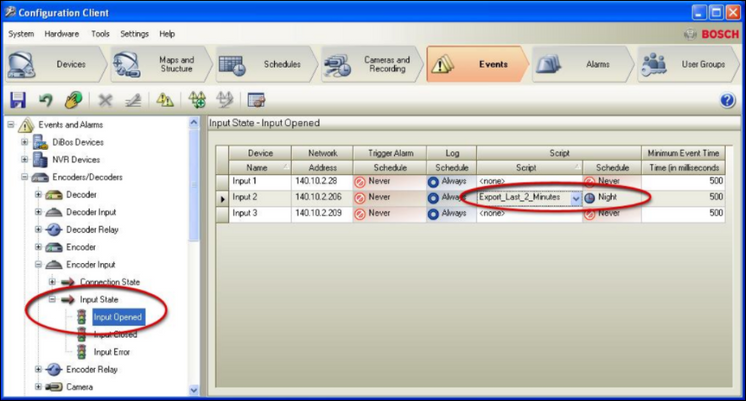
The “using” / ”Imports” declarations bring in different sets of commands that are provided by so called “name spaces”.
Comments can be entered by putting “//” (C#) or “’” (VB.net) at the beginning of a line.
The “public class” is the body of the script file. Between the first “{“ and the last “}” of the file you can add different subroutines (C#).
New scriptlets will be added after the last scriptlet in the file.
Use the Dispose method to clean up resources. For client scripts, the Dispose method gets called when the Operator Client application exits. For server scripts, the Dispose method gets called when a new configuration is activated.
using System;
using System.Diagnostics;
using System.Collections.Generic;
using log4net;
using Bosch.Vms.Core;
using Bosch.Vms.SDK;
[BvmsScriptClass()]
public class ServerScript : IDisposable
{
private readonly IServerApi Api;
private readonly ILog Logger;
public ServerScript(IServerApi api)
{
this.Logger =
LogManager.GetLogger("ServerScript");
this.Api = api;
}
public void Dispose()
{
// Use this method to cleanup any resources here
(consider fully implementing the Dispose pattern).
// For example, stop and dispose any started
timers. Ensure that all threads that were started
are stopped here.
// DO NOT BLOCK in this method for a very long
time, as this may block the applications current
activity.
}
[Scriptlet("computer generated GUID")]
public void ServerScriptlet(EventData e)
{
// Insert code here
}
} |
Imports System
Imports System.Diagnostics
Imports System.Collections.Generic
Imports log4net
Imports Bosch.Vms.Core
Imports Bosch.Vms.SDK
<BvmsScriptClass()> _
Public Class ServerScript
Implements IDisposable
Private Shared Logger As ILog
Private Shared Api As IServerApi
Sub New(api As IServerApi)
Logger =
LogManager.GetLogger("ServerScript")
Me.Api = api
End Sub
Public Sub Dispose() Implements
IDisposable.Dispose
' Use this method to cleanup any resources here
(consider fully implementing the Dispose pattern).
' For example, stop and dispose any started
timers. Ensure that all threads that were started
are stopped here.
' DO NOT BLOCK in this method for a very long
time, as this may block the applications current
activity.
End Sub
<Scriptlet("computer generated GUID")> _
Public Sub ServerScriptlet(e As EventData)
' Insert code here
End Sub
End Class |
Quick start (Client Enterprise SDK)
The RemoteClientApiEnterprise class is the entry point of the SDK. Create an object of the class RemoteClientApiEnterprise by passing the client address and the user credentials to the constructor.
RemoteClientApiEnterprise class
Create an object of this class by passing the client address and the user credentials.
The created object provides properties to access different kind of functionalities:
- AlarmManager: gives access to alarm management as accept, unaccept, clear alarms…
- ApplicationManager: gives access to application status (logged in user, group, live or playback status…)
- CameraManager: gives access to all cameras and helper methods for camera identification
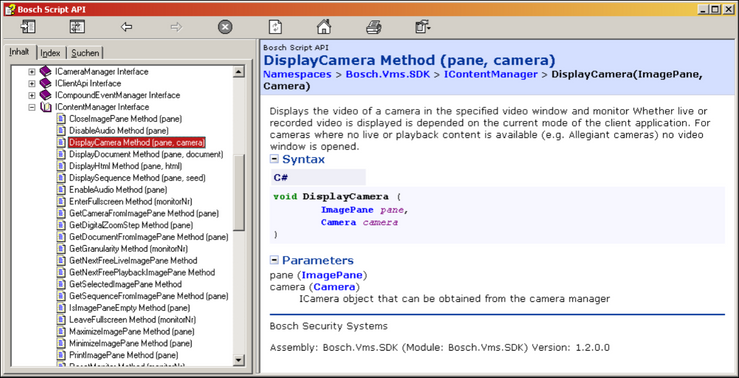
- ContentManager: gives access to methods that control the UI of the Operator Client (display a camera, document, change to full-screen mode, control Image window…)
- DeviceManager: gives access to all devices and helper methods for device identification
- DocumentManager: gives access to all documents and helper methods for document identification
- DomeCameraManager: give access to all dome cameras and helper methods to control the cameras (PanTiltZoom, prepositions…)
- TimelineManager: gives access to methods that control the playback mode of the Operator Client (change playback speed, move to a specific position, control playback direction…)
- The class RemoteClientApiEnterprise provides an event ConnectionLostEvent that is triggered when the remote Api has lost the connection to the Operator Client.
Quick Reference (Client Enterprise SDK)
IAlarmManagerEnterprise
- To be able to receive Alarms a class derived from AlarmReceiverEnterprise must be defined and an object created.
- OnAlarm(IEnumerable alarmData) is called by the SDK to submit alarms and their state changes to the 3rd party client application.
- IAlarmManagerEnterprise provides methods to manage alarms (accept, clear, unaccept), to get a list of current alarms and to register/unregister to receive alarms with the above described callback method OnAlarm(…).
IApplicationManagerEnterprise
The application manager interface IApplicationManagerEnterprise provides methods to get the following information:
– logged in user: user name, user group
– Operator Client mode: live or playback
– Server information: list of server Info objects that contain the display name, the network name and the serverId of each server
The application manager interface IApplicationManagerEnterprise provides methods to control the following:
– Change the Operator Client mode to live or playback
– Fire user events
– Post a message that is shown on the Operator Client system
– Speak a submitted text on the Operator Client system
IDeviceManagerEnterprise
The device manager interface provides methods to get the following:
– Device object by providing an Instance Id or a name
– Name of a Device object
ICameraManagerEnterprise
The camera manager interface is inherited from the IDeviceManagerEnterprise providing methods to get the following:
– List of Camera objects that are added to the Logical Tree of the Operator Client
– Camera object by providing an InstanceId, a name or a local or a logical number
IContentManagerEnterprise
The content manager interface provides methods to control the UI of the Operator Client and to get status information about the content of the Image window.
The document manager interface provides methods to browse all documents (html documents and maps) and to get a document object by passing an id or name.
IDocumentManagerEnterprise
The document manager interface provides methods to browse all documents (html documents and maps) and to get a document object by passing an id or name.
IDomeCameraManagerEnterprise
The dome camera manager interface provides methods to browse all dome cameras, to get a dome camera object by passing an ID or name and to control a dome camera (PTZ, focus, Aux, Iris…)
ITimelineManagerEnterprise
The timeline manager interface provides methods to remote control the playback mode of the connected Operator Client. For example the current timeline position can be set, the playback direction and speed can be changed.
Cameo SDK
This chapter provides information on how to get started with Cameo SDK documentation and the Cameo SDK Test Application including a complete C# project.
NOTICE!
You must have selected the Cameo SDK Manuals checkbox during setup to install the manuals and the test application an your computer.
To display the Cameo SDK reference help:
– Click Start, then select Bosch VMS, select Cameo SDK, and then click Cameo SDK Help.
The Cameo SDK reference help is started.
To start the Cameo SDK test application:
– Click Start, then select Bosch VMS, select Cameo SDK, and then click Cameo SDK Test Application C# Project.
The test application is started.
To start the Cameo SDK test project:
– Click Start, then select Bosch VMS, select Cameo SDK, and then click Cameo SDK Test Project.
A C# project is started in your development environment containing the source code of the Cameo SDK Test Application C#Project.
Installation
This chapter provides information on the installation of Cameo SDK and Client Enterprise SDK
NOTICE!
You can install CameoSDK as a bosch VMS component using the Bosch VMS Setup.
Quick start
This chapter provides information on how to get started with CameoSDK and with Client Enterprise SDK.
Bosch VMS Cameo SDK is represented by Bosch.Vms.CameoSdk.dll file that is available on the target computer after CameoSDK installation (\CameoSdk\ folder).
To use this assembly just add it to the referenced assemblies list in your C# project.
Here is a code sample for Cameo SDK:
|
CameoSdkParameters parameters = new CameoSdkParameters(uniqueId, pathToCameoSdkBinaries,
useInternalLoggingSettings, mainForm);
Sdk = EntryPoint.GetSdk(parameters);
Sdk.ConnectionStateChanged += SdkConnectionStateChanged;
Sdk.ScheduleLogoffRequired += SdkScheduleLogoffRequired;
Sdk.ConfigurationStateChanged += SdkConfigurationStateChanged;
StartupResult result = Sdk.Startup(serverAddress, userName, userPassword,
StartupMode.TryUpdateConfiguration);
if (result == StartupResult.Ok)
{
// user code
}
Sdk.Shutdown();
|
Here are a few tips that should be kept in mind for successful Cameo SDK assembly usage:
– all DiBos components should be properly registered (by installation of compatible Bosch VMS Operator or Config Client)
– the folder which contains core components (Bosch.Vms.CameoSdk.Core.dll) should contain all VideoSDK required files (folders: "Bosch.VideoSDK5.BVIP", "Bosch.VideoSDK5.Core", "Bosch.VideoSDK5.DiBos", "Bosch.VideoSDK5.Divar700", "Bosch.VideoSDK5.Experimental", "Bosch.VideoSDK5.ONVIF", "Bosch.VideoSDK5.RTSP"; files: "Bosch.VideoSDK5.manifest").
To start using the CameoSDK create a CameoSdkParameters object and an EntryPoint object, then call the GetSdk (...) method of the EntryPoint class by passing the object CameoSdkParameters to get an ICameoSdk interface.
EntryPoint class
Create an object of this class to start using the CameoSDK. Call the method GetSdk and pass a CameoSdkParameters object to get an ICameoSDK interface.
CameoSdkParameters class
Create an object of this class to be passed to the EntryPoint method GetSdk(...).In the constructor of this class, pass a unique host id that identifies the hosting application, a path to the binary folder of the CameoSDK and the Form object of the hosting application.
ICameoSdk
This interface is returned by the EntryPoint constructor and provides functionality of the CameoSdk, like Startup/shutdown, connection state, configuration state. Other features of the CameoSdk are exposed via properties of type IDeviceManager, ControlFactory, MediaPlayerFactory and ExporterFactory and are described in the following chapter.
Quick Reference
IDeviceManager
This interface provides functionality to discover devices. The RemoteServerApi (from Bosch VMS SDK) has to be used to receive events of device states.
IDevice
This interface provides methods to get the name, the id and the network address of the device
ICamera
This interface represents a camera object. It provides methods to get camera infromation (name, id, network address...) and a PTZ property if the camera is a PTZ camera.
IPtz, IPtzControl, IPtzSettings
These interfaces provide methods to control PTZ cameras
IControlFactory
Provides methods to create live or playback cameo controls, which can be placed in the 3rd party application UI. In case a playback control has to be created then a MediaPlayer object must be passed.
IVideoCameoControl
This interface is returned by the methods provided by the IControlFactory to create Image pane controls. this interface provides methods to assign a camera to the control, to get a snapshot of the currently displayed image (live or playback), to check the connection state to the camrea and to get a UI control that can be placed in the 3rd party application.
IMediaPlayerFactory
This interface provides functionality to create media player controls (playback control). A single media player can be created and associated with several VideoCameoControls, in this case all associated controls will be synchronized (by CurrentPosition)
IMediaPlayer
This interface provides functionality to create a media player control (play, stop change playback direction or speed...)
Note:
If the same MediaPlayer object is passed to multiple Image pane controls, their playback is synchronized. This case is similar to the playback mode of the Operator Client application. A MediaPlayer control can also be created for each Image pane control. In this case the playback is not synchronized and the playback can be controlled differently for each control.
This case is similar to instant playback in the Live Mode of Operator Client.
IExporterFactory
This interface allows creating ASF exporter objects of the interface type IExporter.
IExporter
Provides methods for adding cameras to the export, for starting/canceling the export and tracking the progress.
Examples in C#
Example scriptlet 1: Using a Hardware decoder and showing an OSD-Message
When creating a new scriptlet in the Bosch VMS Command Script editor, the identifier and the method frame of the scriptlet are written automatically into the script file. You only have to enter the code between the curly brackets.
Read the comments for further explanation of what is programmed in the code.
[Scriptlet("system generated script ID")]
public void ShowCameraOnDecoder()
{
Camera c = Api.CameraManager.GetCameraByName("Camera Name");
Decoder d = Api.DecoderManager.GetDecoderByName("Decoder Name");
Api.DecoderManager.DisplayCamera(d, c);
System.Threading.Thread.Sleep(100);
Api.DecoderManager.SetOsd(d, "Hello out there!");
} |

Comments (line-wise):
1: The first attribute is the automatically generated identifier, do not change manually!
2: Initializing the subroutine with the Name of the scriptlet. You can change that name in the code.
4: Initialize a camera object by name, use the system name as you see it the logical tree (hint: you may also identify cameras by their logical number)
5: Initialize a decoder object by name, use the system name as you see it in the device tree (hint: you may also identify cameras by their logical number)
6: Call up method from decoder manager with camera and decoder as parameters
7: Hold the thread for 100 milliseconds. This is inserted because the decoder tends to drop commands when they arrive almost immediately. In this case the OSD Message might get lost when the sleep command is deactivated.
8: Display a string on the decoder using the decoder manager again.
NOTE: You should ONLY use decoders that are not part of any Analog Monitor Group (AMG). Otherwise the AMG control will interfere with the script actions.
Example scriptlet 2: Open and close a relay
This scriptlet opens and closes a specific relay.
This scriptlet is meant to be used in a server script
[Scriptlet("system generated script ID")]
public void OpenAndCloseRelays()
{
Relay r = Api.RelayManager.GetRelayByName("Relay 1");
Api.RelayManager.Open(r);
System.Threading.Thread.Sleep(1000);
Api.RelayManager.Close(r);
} |
|
[Scriptlet("system generated script ID")]
public void ToggleRelays()
{
Relay[] relay_array = new Relay[3]
{ Api.RelayManager.GetRelayByName("Relay 1"),
Api.RelayManager.GetRelayByName("Relay 2"),
Api.RelayManager.GetRelayByName("Relay 3")
};
foreach (Relay r in relay_array)
{
if (Api.RelayManager.GetState(r) == RelayState.On)
{
Api.RelayManager.Open(r);
}
else
{
Api.RelayManager.Close(r);
}
}
}
|
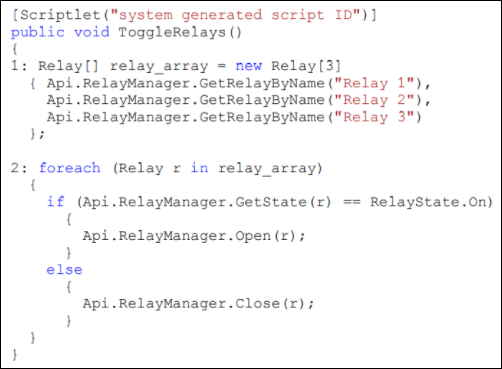
Comments (line-wise):
1: Open a new array of relays
2: Initializing the for each loop which checks each relay state and inverts it.
Example scriptlet 4: A scriptlet with a switch case block
In this example a server scriptlet is presented which switches different sets of relays in dependency of an argument string. In this special case we use the event arguments (“e”) which provide for example the device name (“e.DeviceName”). Take motion detection as the event that triggers this script.
If “Camera 1” triggers then the script does that, if “Camera 2” triggers it does something else, and so on…
In the switch case block you define the different behaviors per option. The default behavior can be set in the default block,
E.g. in the default case don’t do anything.
|
[Scriptlet("system generated script ID")]
public void OnCameraEventSwitchRelays(Event e)
{
List RelayList = new List();
Boolean Toggle = true;
switch(e.DeviceName)
{
case "Camera 1":
RelayList.Add(Api.RelayManager.GetRelayByName("TR01"));
break;
case "Camera 2":
RelayList.Add(Api.RelayManager.GetRelayByName("TR02"));
break;
case "Camera 3":
RelayList.Add(Api.RelayManager.GetRelayByName("TR03"));
RelayList.Add(Api.RelayManager.GetRelayByName("TR04"));
RelayList.Add(Api.RelayManager.GetRelayByName("TR05"));
break;
default:
Toggle = false;
Logger.Info("unknown Devicename");
break;
}
if (Toggle) // closing all relays in the relay list
{
foreach (Relay r in RelayList)
{
Api.RelayManager.Close(r);
}
}
}
|
Example scriptlet 5: Fill a monitor with cameras 1-9
This example uses the client script API. It changes the layout on the client and fills the image panes with different cameras.
Api.ContentManager.ResetMonitor(1); // clears monitor 1 and sets it to a standard 3x3 grid
for (int i = 1; i <= 9; i++) // counts i from 1 to 9
{
Api.ContentManager.DisplayCamera(new ImagePane(1, i),
Api.CameraManager.GetCameraByLogicalNumber(i)); // opens camera i in imagepane i
} |
Comments (line-wise):
1: Resets the monitor 1. That means that the 1st monitor is cleared and set to a regular 3x3 grid.
2: A “for”-loop that counts the variable integer variable “i” from 1 to 9
4: for each loop camera i (logical camera number) is opened in image pane i, so that the whole image window is finally filled up with different cameras
Example scriptlet 6: If an input is “on” then reposition a dome camera
This example is just one command, using an if-construct and the command to reposition a dome camera. Here the camera is found by logical number.
public void DomeCameraInRespondToInput()
{
if (Api.InputManager.GetState(Api.InputManager.GetInputByName("Input Test 1")) == InputState.On)
{
Camera cam= Api.DomeCameraManager.GetDomeCameraByLogicalNumber(42);
Api.DomeCameraManager.MoveToPredefinedPosition (cam, 3);
}
} |
Example scriptlet 7: Remote connection with Exception Handler
Use “ConnectToServerApi()” to connect remotely to a Bosch VMS client or server.
The connection commands are protected with try/catch blocks, so that the application does not crash if the connection to the Remote API fails.
IServerApi ServerApi;
IClientApi ClientApi;
void ConnectToServerApi()
{
try
{
ServerApi = new RemoteServerApi(serveraddress, username, password);
//"localhost:5390", "Admin", ""); //Important: right port number
}
catch (Exception mye)
{
MessageBox.Show(mye.Message, "Connection to server failed!");
}
}
void ConnectToClientApi()
{
try
{
ClientApi = new RemoteClientApi(serveraddress, username, password);
//"localhost:5394", "Admin", ""); //Important: right port number
}
catch (Exception mye)
{
MessageBox.Show(mye.Message, "Connection to client failed");
ClientConnected = false;
}
} |
Example executable 8: Control Operator Client in response to a Virtual Input Data event and read out the data
This example shows you how to react within the Operator client on a certain event (e.g. by opening a dedicated cameo)..
An executable reads out the EventData and switches through the Virtual Input Data field one. Different data causes different reactions.
The default block defines the behavior if the value is not matching or unknown.
|
string serverIpAdr = "192.168.2.3:5390"; // server IP address, followed by port number 5390
string clientIpAdr = "192.168.2.17:5394"; // client IP address, followed by port number 5394
string loginName = ; // login name
string loginPassword = ; // login password
RemoteServerApi ServerApi = new RemoteServerApi(serverIpAdr, loginName, loginPassword);
RemoteClientApi ClientApi = new RemoteClientApi(clientIpAdr, loginName, loginPassword);
MyReceiver er = new MyReceiver();
ServerApi.EventManager.Register(er);
public class MyReceiver : EventReceiver
{
public override void OnEvent(EventData e)
{
//Do something here.
switch (e["Data1"]) //reads out the EventData for the 1st Virtual Input Data String (Data1)
{
case "camera01": //If it is "camera01" it will execute this case // open a certain cameo, e.g. for camera1
break;
case "camera02": //If it is "camera02" it will execute this case // open a certain cameo, e.g. for camera1
break;
default: //If no cases fit it will execute the default case
Logger.InfoFormat("Content of Data1 unknown - event: {0}", e.ToString());
break;
}
}
}
|
Question and Answers
Q: Do I have to be a .NET developer to create a command script?
A: No, you don’t. Using the SDK only requires a basic programming understanding. It uses the .net languages VB.net or C# to be 100% compatible with the application code which is also .NET based.
Q: Why did you choose VB.net or C# as the language for the SDK and for the command scripts?
A: The top 3 reasons for that are:
1) .NET languages are the most modern languages you may use. Especially C# was invented to get the advantages of C and Java into a new language, being code reducing, restrictive and straight.
2) The complete application runs in a .NET environment. Using the same language makes command scripts and SKD actions 100% compatible to the main software. This way we benefit from a higher stability and performance.
3) C# is not C++, it is much easier, plus we hide the mystery of object orientated languages to the user. All you need to do is program a scriptlet (like a macro) which anyway contains more or less the SDK commands only. VB.net might be the preferred language for those of you who have already experience in Visual Basic.
Q: Can I use the same script file on another Bosch VMS?
A: Yes, you can. Easiest you would export the script file in the command script editor and import it on the other Bosch VMS.
Note: In this case you would overwrite the existing script file on the other Bosch VMS (if there is one).
Q: How can I use the SDK from a 3rd party application?
A: See example executable 8. You need to instantiate the Client (Enterprise) and/ or the Server API in the 3rd party context.
And you need to reference the Bosch.Vms.SDK.dll in your development environment.
To control an operator client depending on server states or alarms you shall access the server SDK from the dedicated operator client.
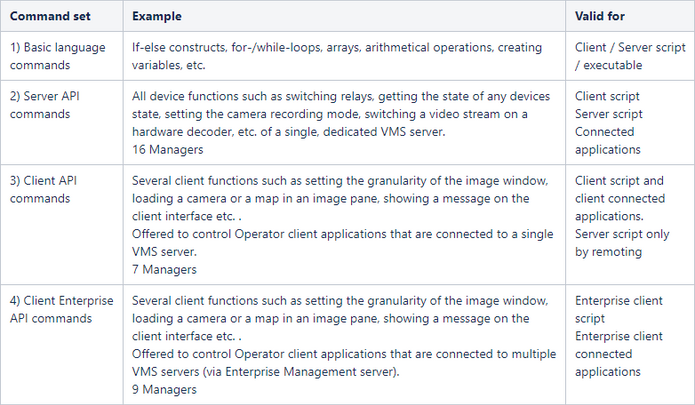
Q: What SDK commands can I use in the client script?
A: You can use ALL commands that are provided by the Bosch VMS Client SDK and the Bosch VMS Server SDK.
Q: What SDK commands can I use in the client Enterprise script?
A: You can use ALL commands that are provided by the Bosch VMS Client Enterprise SDK.
Q: What SDK commands can I use in the server script?
A: You can use all server commands (look into the interface IServerApi in the Bosch VMS SDK help). Please do not use the client SDK from within a server script!
Q: Why does my camera not load in response to a command script?
AKA: Why does my relay not switch in response to a command script?
A: The command script editor is very restrictive. It allows saving the script file only if it does not contain any errors. So in 95% of the cases (raw estimation) a typo in the name argument of the “Get…ByName” method is the cause of a malfunction.
Please check it very thoroughly: Mind case sensitivity and spaces inside device names.
