- Top Results
- Bosch Building Technologies
- Security and Safety Knowledge
- Security: Video
- Who rated this article
Who rated this article
BVMS - ANR 2.0 feature, configuration, direct replay and troubleshooting
|
🕒This procedure takes in average ~ 20 min to complete |
This article lists how to configure ANR feature in BVMS and how to set up correctly the iSCSI and direct replay.
Step-by-step guide:
- Configuration of ANR in BVMS system
- Insert SD card into camera and power it on.
- In Configuration Client, select Devices page.
- Device password and CHAP password. There are two possible configuration set ups - to configure password for both device and iSCSI connection or to leave both without password. Choose and configure one of them (3.1 or 3..2).
Note: Mixing the parameters between the two options 3.1 and 3.2 will lead to issues in direct replay from SD card.
3.1. Set device user password and CHAP password
BVMS 11 and above
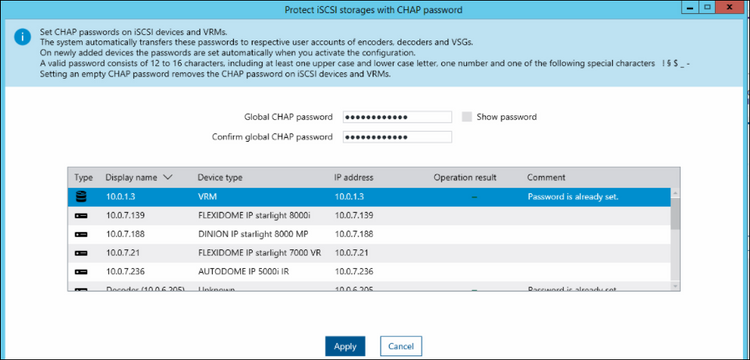
For BVMS 11 Set a Global CHAP password.
See detailed guide here:

Below BVMS 11
3.1.1 Set user password for the device
3.1.2 Assign the Global iSCSI connection password(CHAP password). This must be the same password as the “user” account password. Main Tab - Settings, the Options.

3.2. No CHAP password for ANR
3.2.1 Leave the user password for the device empty
3.2.2 Do not assign the Global iSCSI connection password (CHAP password). Main Tab - Settings, the Options.
- BVMS 11 and above

- Below BVMS 11

4. Go to the Devices page
5. Expand VRM Devices node
6. Select the video device (camera) to use ANR.
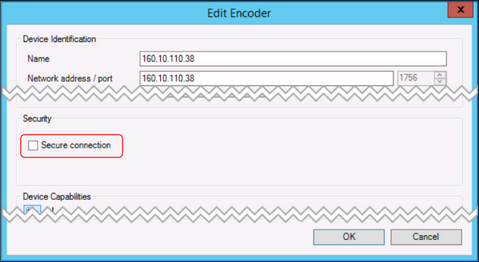
7. Right-click on the camera and select “Edit encoder”

8. Uncheck the Secure connection checkbox.
Note: If the check box remains checked, the recording cannot be accessed at all and no timeline is displayed.
9. Click the OK button.

10. Click on Recording –> Recording Management.
11. Stop the Primary recording by clicking on the Stop button

12. Under Secondary Recording, for Preferred storage target type, from the drop-down menu, select SD card.

13. The Local target field will display the SD card properties

14. Click on the Save icon 
15. Select Cameras and Recording page.
16. Select VRM option to see all recording details of VRM cameras.
17. Under the Recording column, check the ANR box of the camera.
*Option might be grayed out, if camera does not support ANR or dual recording enabled.

18.Click on Save icon
19.Click on the Activate icon
20.Go back to Devices page, camera’s Recording Management tab.
21.Under Secondary Recording section, hover the mouse over the HDD icon
22.The Recording Status bubble will pop-up to indicate that it is recording to SD card.

23. Check the playback from iSCSI and from ANR SD-Card in the Operator Client - on the playback Cameo of the respective camera, click on the Video source icon and choose the ANR replay . For playback issues from the SD-Card, please refer to the next troubleshooting section

Troubleshooting of direct SD card replay
Issue: The SD card recording cannot be accessed at all and no timeline is displayed.
- Disable the “Secure Connection” on the camera (Devices tab > right click on the camera > select "Edit encoder" > uncheck Secure connection > OK)

- Recording encryption should be disabled: Devices - Select the appropriate VRM device. Select the Service tab. Select the Recording encryption tab. Encrypted recording should be disabled.
Issue: By replay the timeline is visible, however, the cameos remain black.
- Case 1: Check the user password of the camera and the Global iSCSI connection password(CHAP password). These two passwords should be identical or if one of them is not set the other should also be left empty.
- Case 2: If there is no CHAP password set, there is no user password set and the secure connection was unchecked, but the image remains black in the playback mode from Operator Client, you should uncheck the Access protection enforcement for your camera and then Save & Activate your configuration from Configuration Client.

Still looking for something?
- Top Results


